Serial NO : A004006-EN
Date of Editing : 2020-04-01
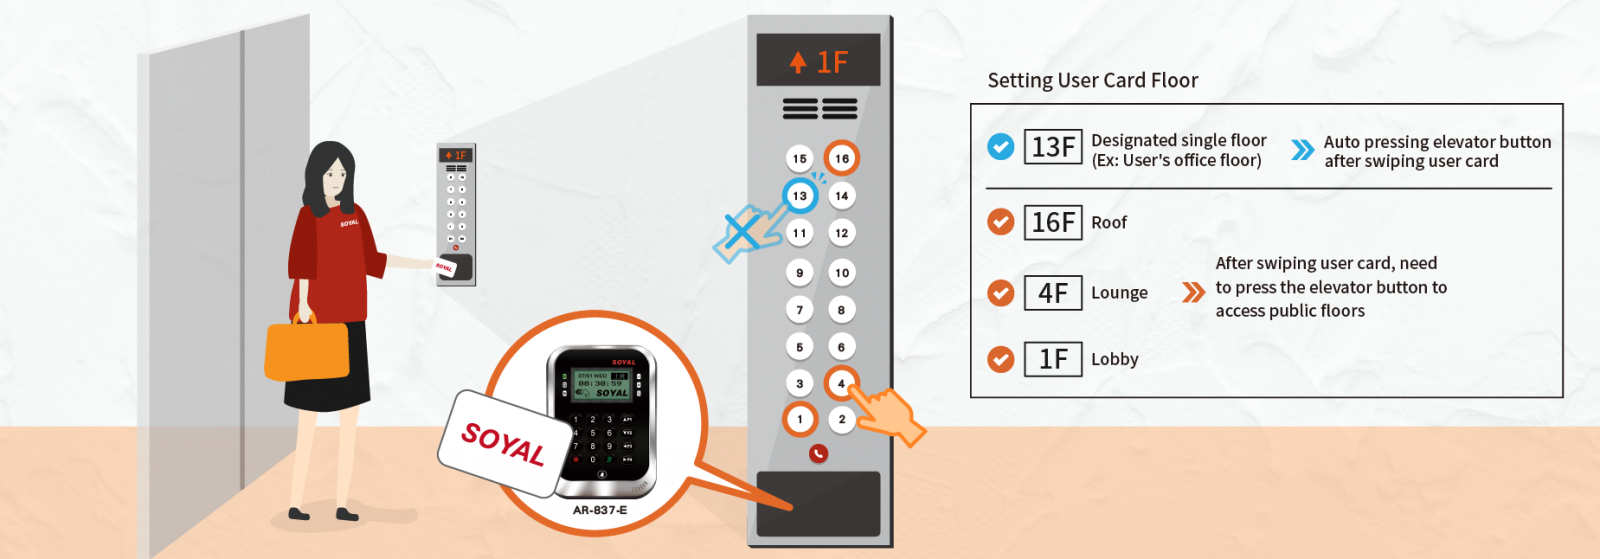
Questions : Touchless Lift Control Solution - - - swiping card, automatically the elevator arrives at the designated single floor, No button pressed No infection
Answer:
Index:
3.Software & Firmware Installation & Nord ID No. Set-up
1.Application Introduction
Touchless Lift Control Solution is a feature for users to reach a designated single floor by swiping the user card only without pressing the elevator button rather than reading a user card and then pressing the floor button. It’s a special application that suited in the environments that require high hygiene security level such as hospital, Maternal and Child Center, Confinement center, etc.
Usually each individual user may have access to a single floor besides the public floors in the community buildings. It’s not only for reaching a single floor but also enabling access to the public floors such as Lobby, Lounge, Roof, etc.
2.Hardware
2-1 AR-401-IO-0016R Lift Controller Panel
a. For auto pressing single floor’s lift button: it requires 2 pcs of AR-401-IO-0016R
b. For having access to the public floors control: please put all public floors control in one specific AR-401-IO-0016R that do not auto trigger.
For the requirement of exceeding 16 floors, it needs to double the quantity of lift controller panel.
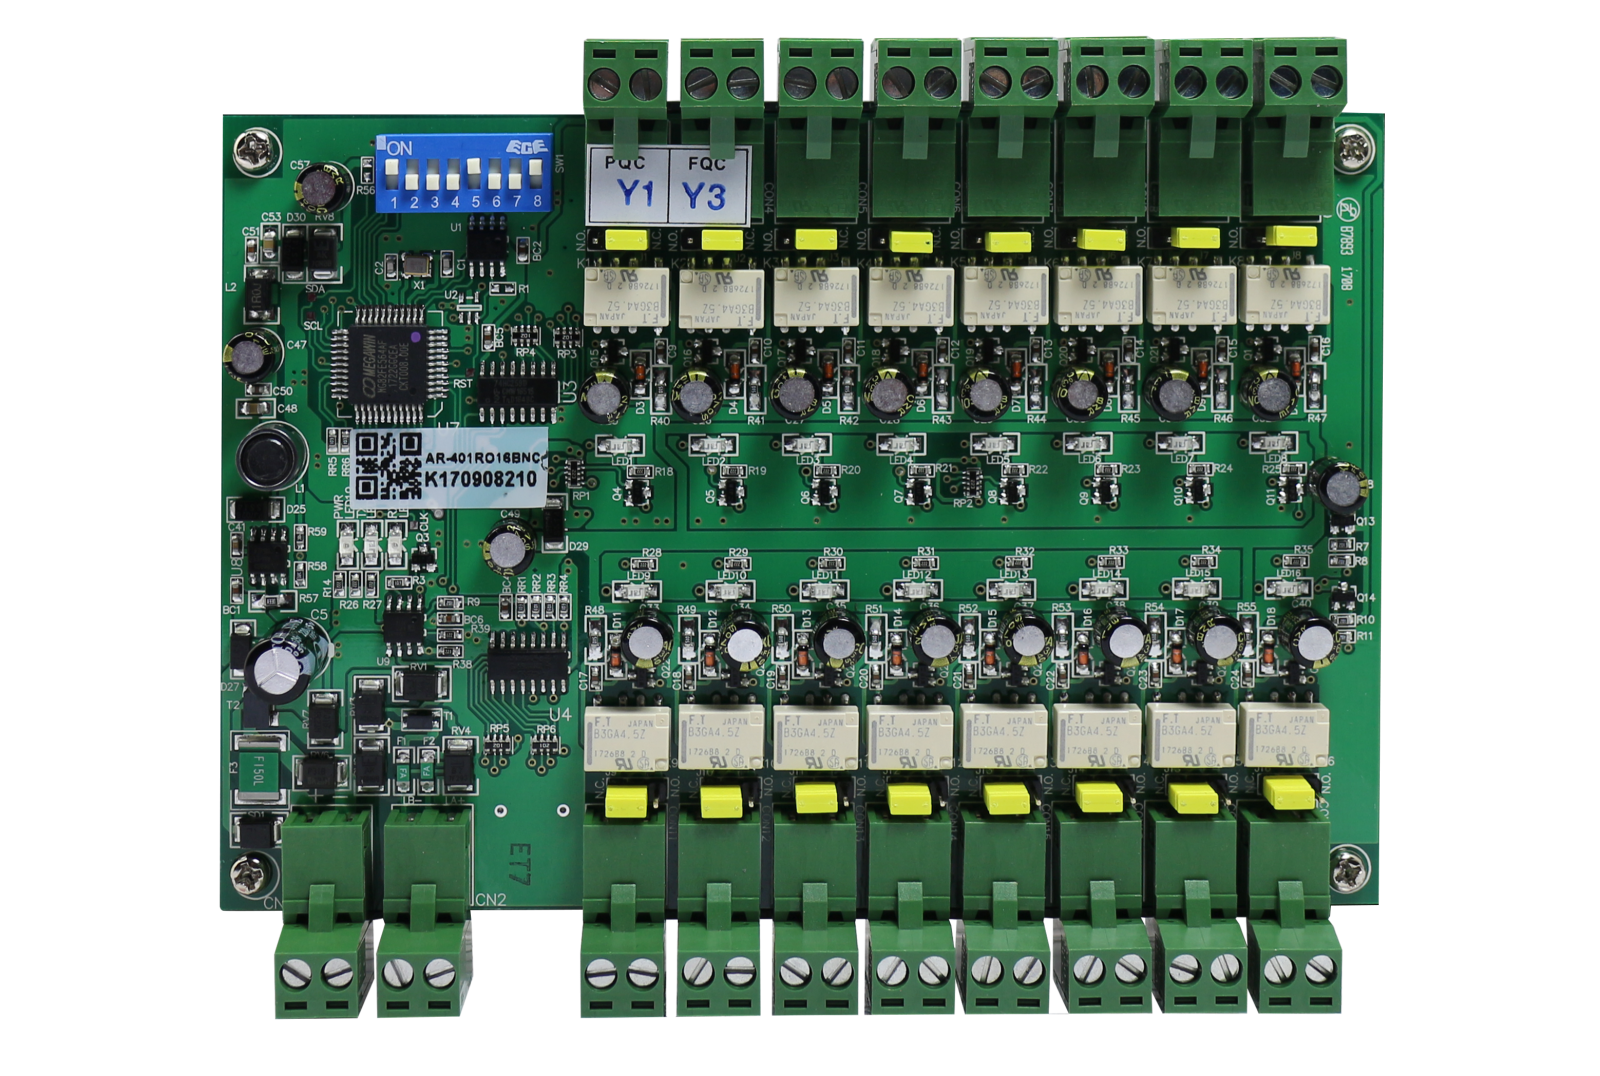
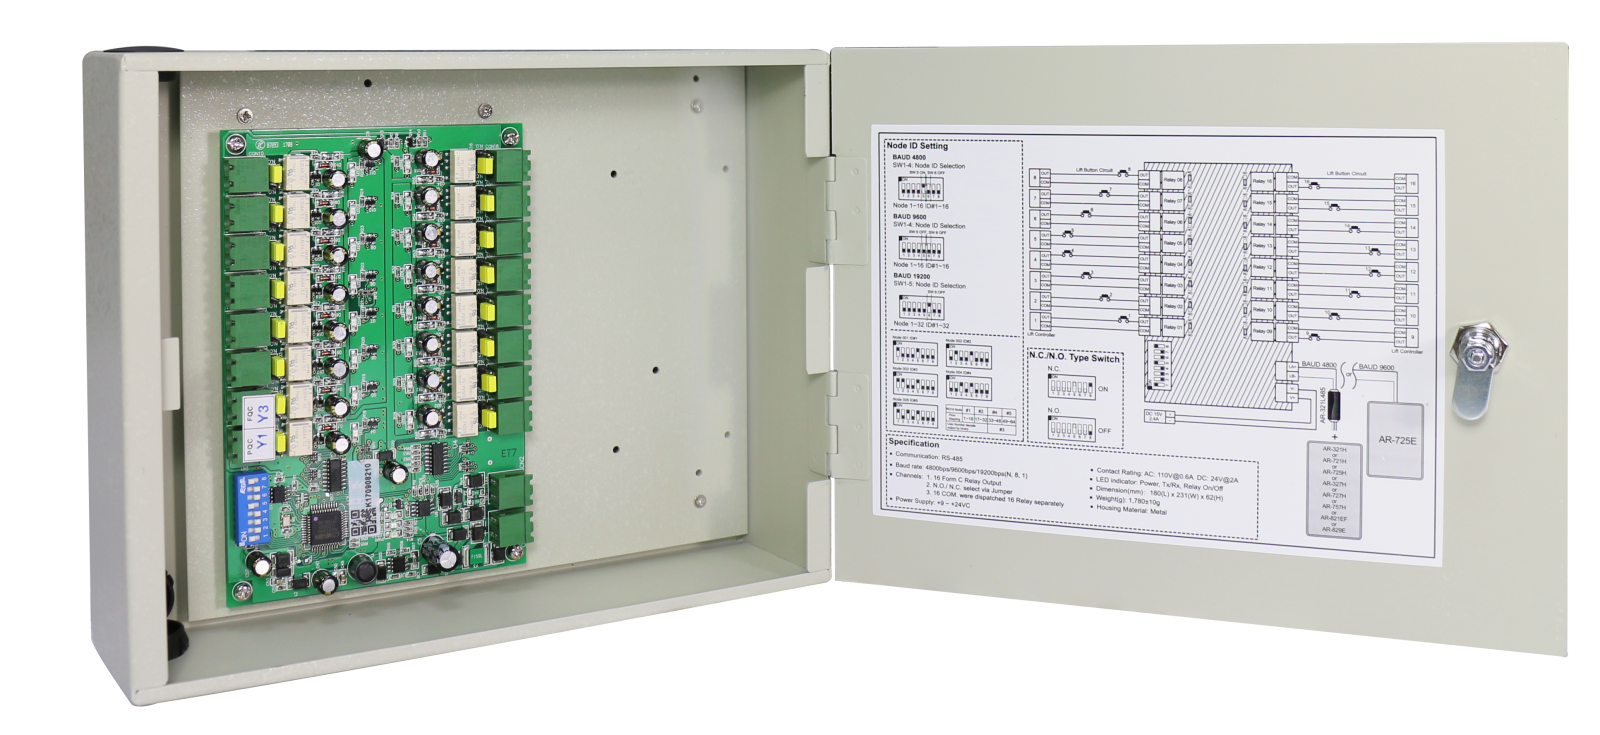
*Metal case & mounting base are optional to order.
2-2 RS485 Controllers with Contactless RFID Readers
SOYAL provide wide choices of RS485 Controllers, please see brief below:
a. Economic: AR-721H with keypad, AR-723 keyless, AR-757 keypad and door bell, AR-101H Mini
b. Fashion: AR-725E illuminated touch keypad, AR-888 flush mount
c. Metal: AR-321H zinc alloy housing, AR-331H mullion type
d. LCD: AR-327H, AR-727H, AR-837E (optional with QR Code, Fingerprint as well)
*More product details please see www.soyal.com
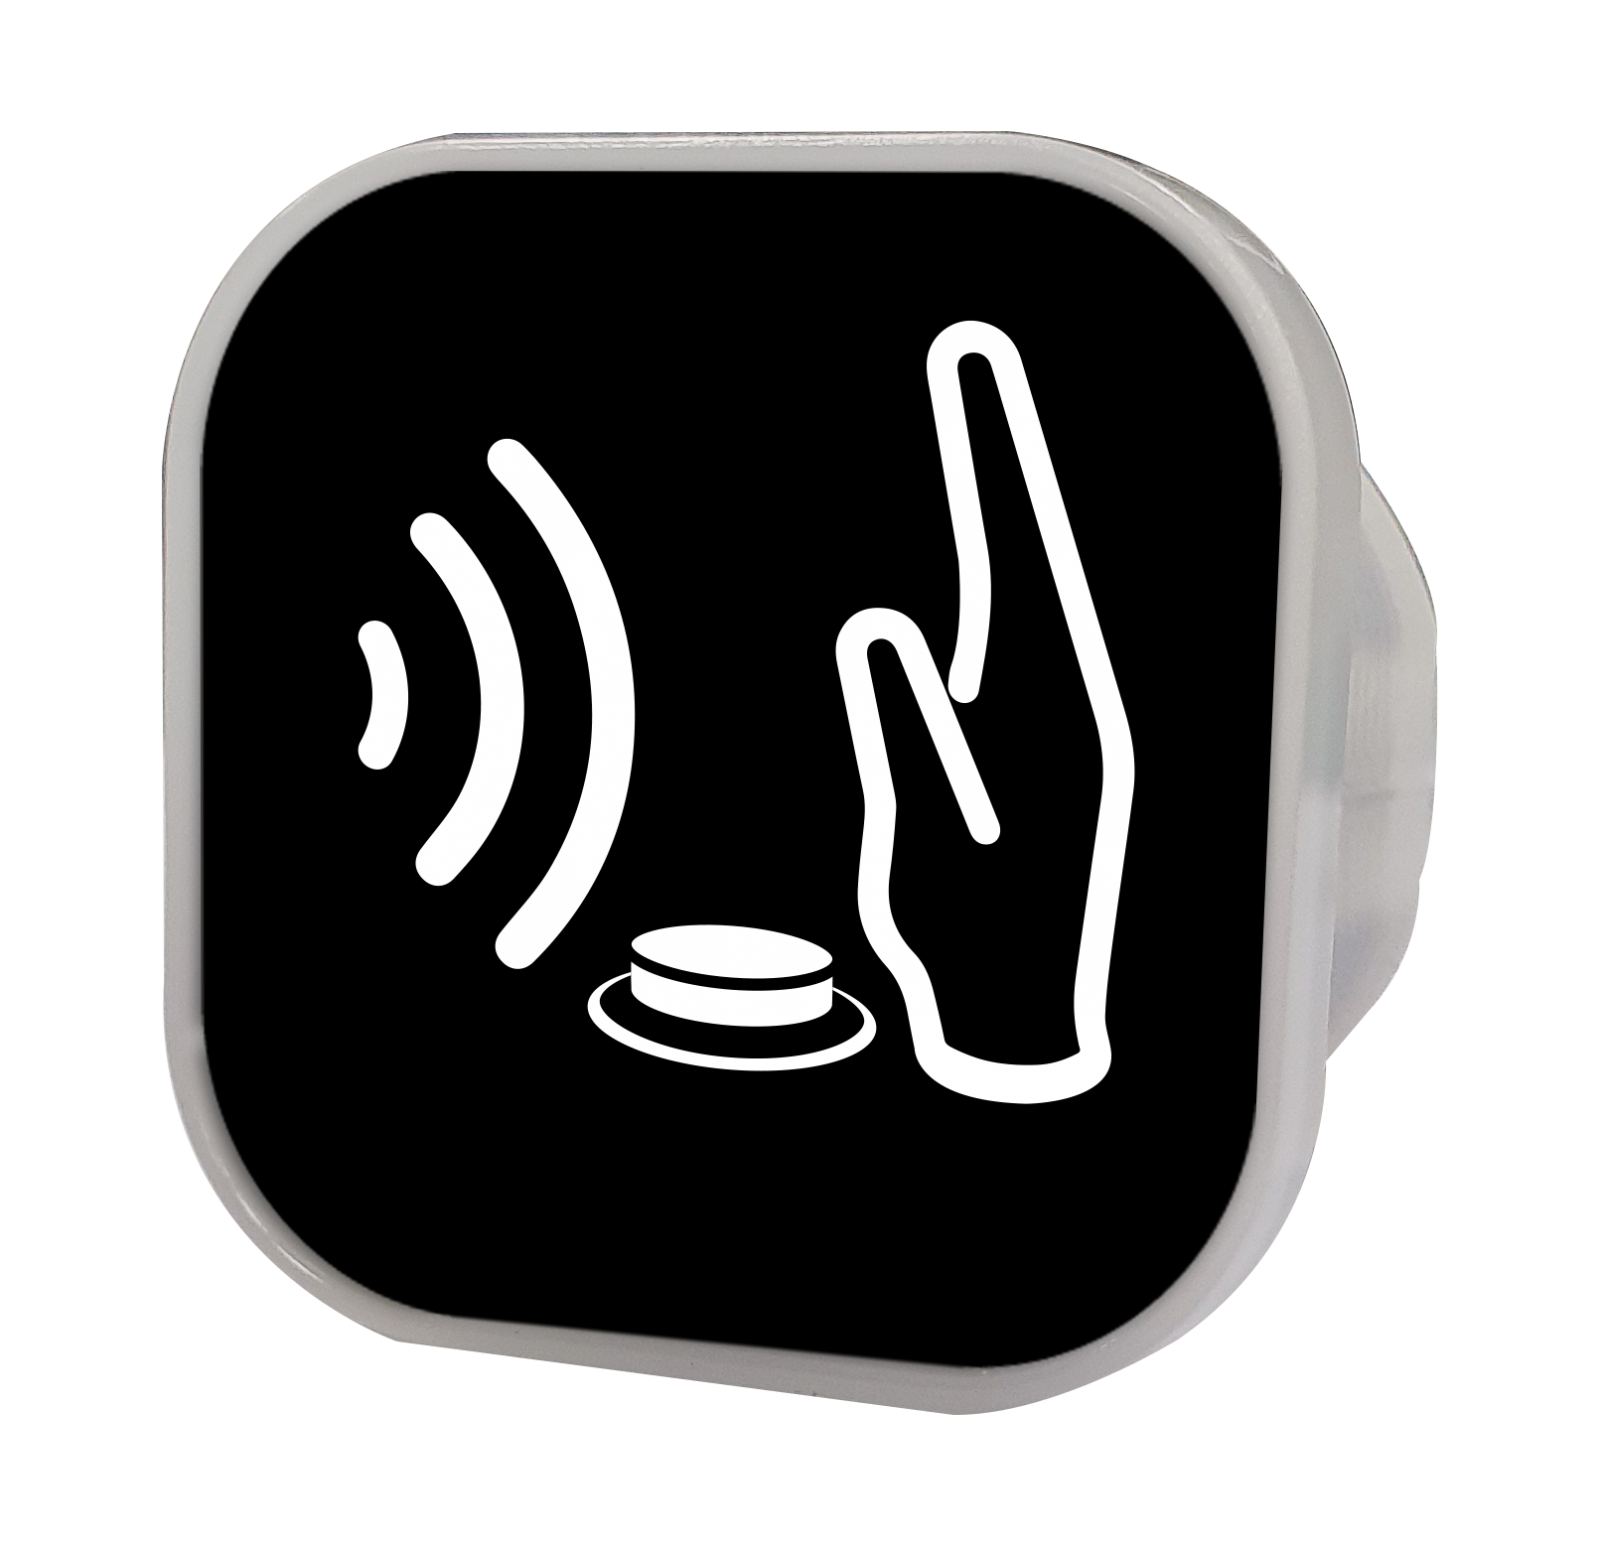
2-3 Mini 101 Infrared Push Button
.png)
.png)
For 1st floor’s elavator button, welcome to replace it with AR-101PBI, so everytime you want to reach 1st floor, no need to press button, just wave your hand for IR sensing.
*Two frame LED colors for option (Green&Red OR Blue&Red).
3. Software & Firmware Installation & Nord ID No. Set-up
3-1 For auto pressing single floor’s lift button: it requires 2 pcs of AR-401-IO-0016R
a. No. 1 AR-401-IO-0016R with SOYAL standard firmware
b. No. 2 AR-401-IO-0016R with special firmware version: 401RO16_V0207_200407 Only1of16 ForNoMode.ISP (please contact SOYAL sales team to get this special firmware version). Please update firmware by ISP Tools.
c. Set up the same Nord ID no. 1 for both controllers AR-401-IO-0016R.
3-2 For having access to the public floors control: please put all public floors control in one specific AR-401-IO-0016R and must set up the different Nord ID no. for example Nord ID no. 5.
4.Wiring & Lift Number
a. No. 1 AR-401-IO-0016R: serial link and all COM-points linked respectively. Keep the floor number as it is.a.
(Linked with the floor buttons, following a typical floor control structure, when the card is enabled for floors 1/2/5, the corresponding three floor buttons will be activated when swiped.)
b. No. 2 AR-401-IO-0016R: parallel link and all COM-points linked respectively. Keep the floor number as it is.b.
(Using special firmware and connected in parallel with the floor buttons, a command for a single floor will automatically activate the corresponding floor button of the elevator. If the card has access to multiple floors, the elevator button will not be activated. In other words, only the unique floor within these 16 floors will be activated.)
c. No. 3 AR-401-IO-0016R: serial link and all COM-points linked respectively.
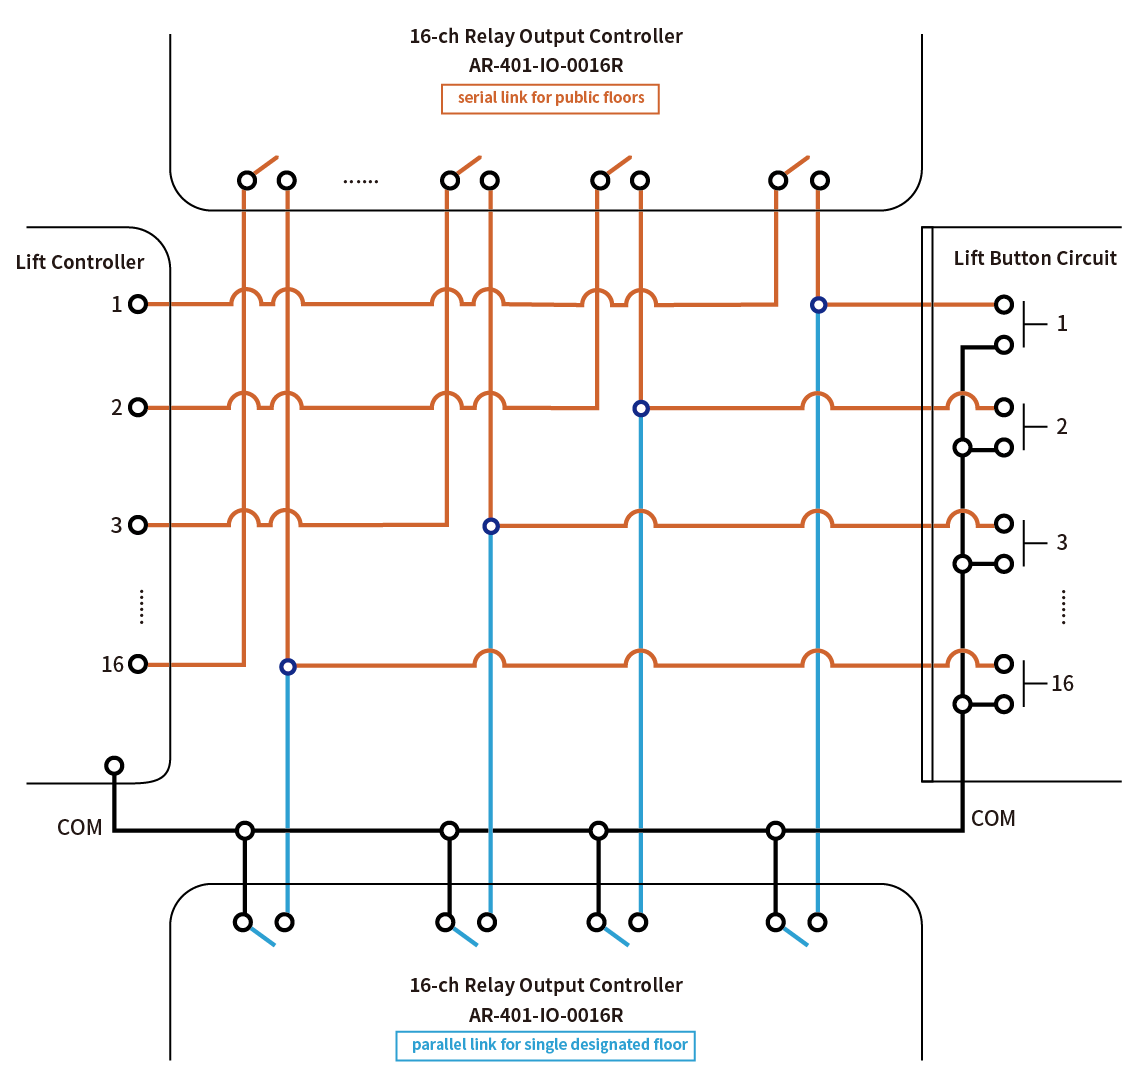
Because all the public floors are centralized and controlled by the AR-401-IO-0016R with station number set as 5, the control range is from 48 to 64. Therefore, it is necessary to modify the floor number settings of the public floors to be after 48 and avoid using the original floor numbers.
Example: Public floor 1 is the lobby, 4 is the lounge, and 16 is the rooftop. Please modify them as follows:
1st floor: 1 → 62
Lounge floor: 4 →63
Roof floor: 16 →64
4. Software Set-up
4.1 Enable Lift Control Setting: run 701Server to Change RS485-3 Option from Default Host Comm. Port to Lift Controller
(1) Click “H/E Serial Controller Paramerter Edit” button on Menu Bar
(2) Select Target Node ID (Eg: Node ID 001
(3) Click”Read from Controller” to read parameter setting from controller
(4) RS485-3 Port change from Host. Comm Port (default) to Lift Controller;
(5) Click “ Write to Controller ” to write new parameter setting to controller
.png)
4.2 edit the floor card for User: Setting via 701Client Software
701ClientSQL Floor Access Editing (Version 10V5 and later)
1.Start by editing the elevator type, elevator name, controller zone code, and station number. Select the user and enable this elevator.
2.Edit the floor names and select the specific floors.
3.After editing the elevator settings, click on "Save".
4.Click on "Write" to download the customized elevator data based on the saved information to each elevator within the specified download range. During the writing process, all enabled elevators that have been selected will be downloaded.
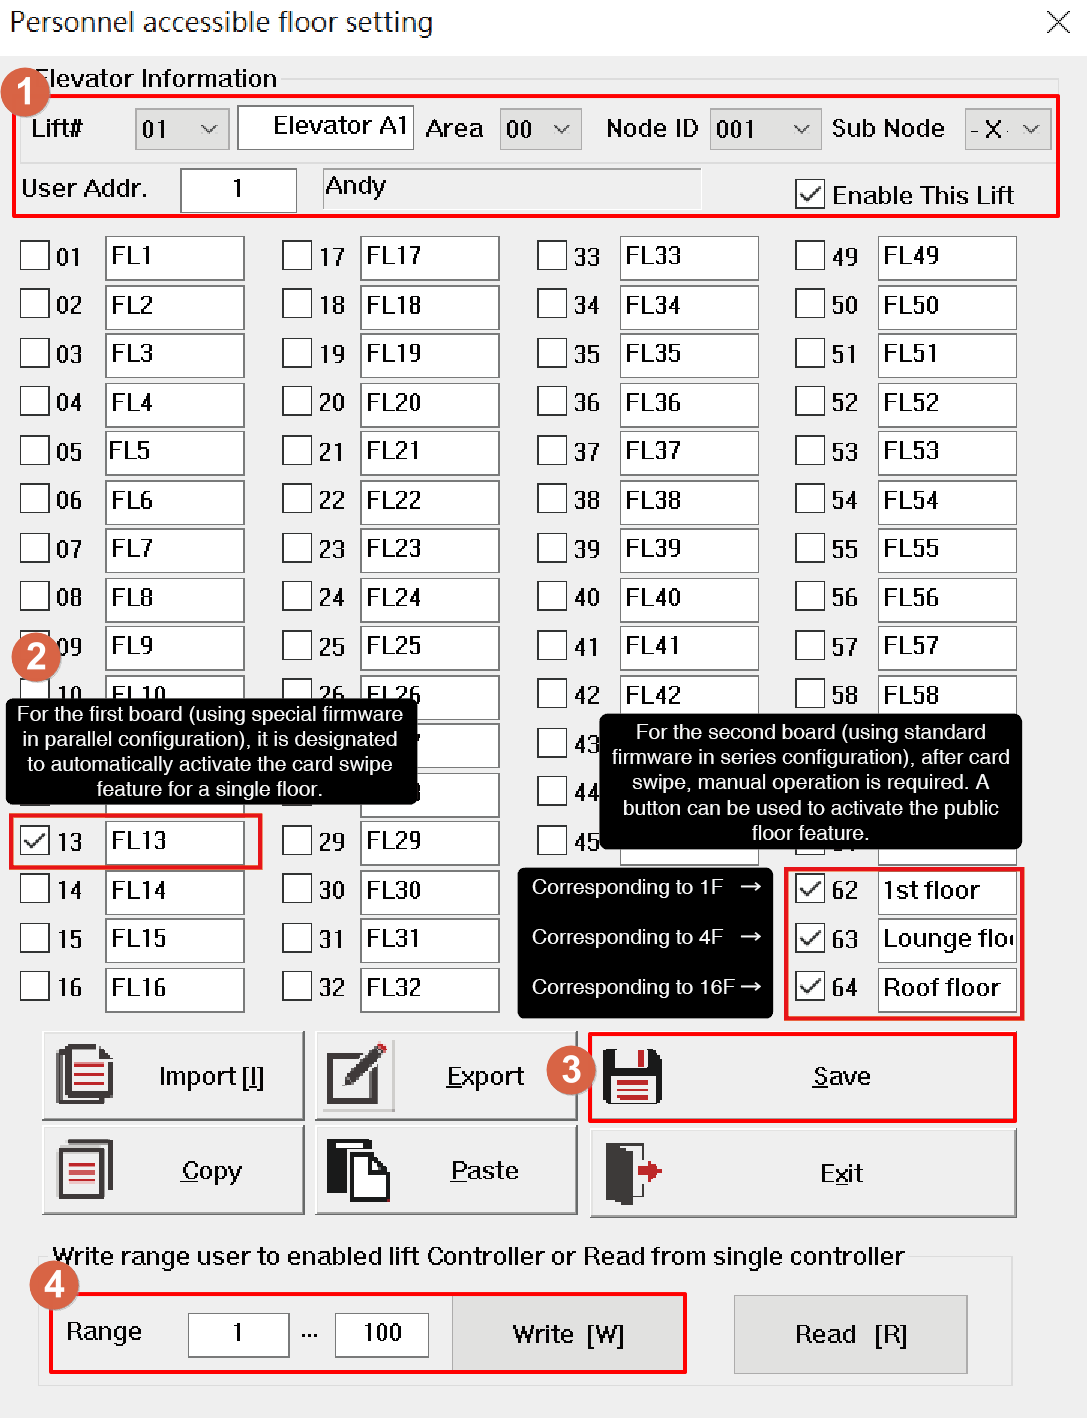
For more detailed floor control settings, please refer to :701ClientSQL Manual Section 11 - Floor Control
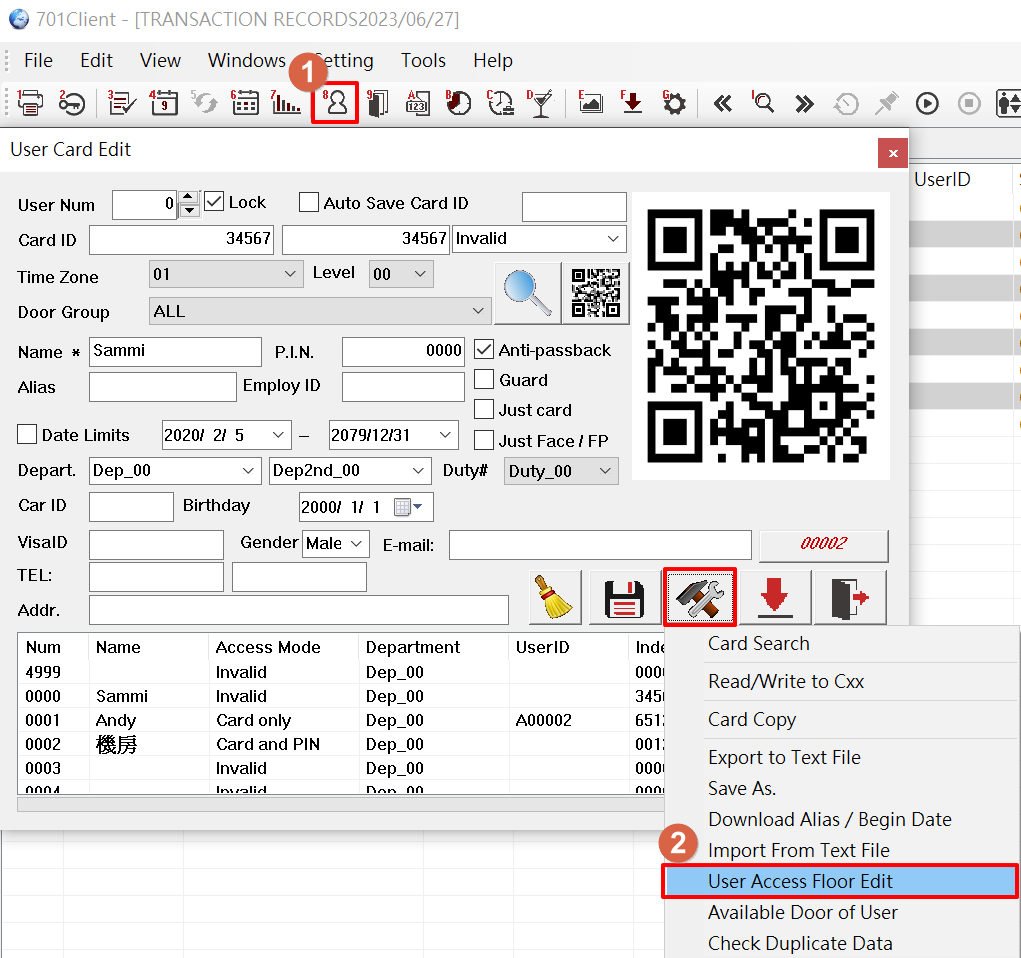
(1) Click [8-User Card Edit] setting icon on Menu Bar
(2) Select [Tools Box]------> [User Access Floor Edit]
(3) Select[User Address]
(4) Connection Download directly to selected controllers listed below,select node ID [001] for the desiganted single floor and [005] for the public floors.
select what user capacity your controller have (this function is only for controller(s) under multi-door controller with the same user capacity only)

(5) Tick [Floor Number] the use allow to access: please tick the designated single floor and the new floor numbers for the public floors. For example: the designated single floor is 13 and the public floors are 62, 63 and 64.
Adjust the option by switching the ‘Show Range’ option into ‘17~32’, ‘33~48’, and ‘49~64’. Rember to click Write One after ticking the floors.
(6) After selecting floors assignment and controllers node ID, there are two ways to saved and download setting to controller:
Option 1. Saved user assignment one by one:
Select [Write One] to save the setting for each user you selected from previous step.
Select [Read One Frpm 1sr Node] to read from the existed saved setting.
This option is usually use for same user who have different floor assignment for different node ID.
Example: User 1 for controller’s node ID 1 can access floor 1 and 2
User 1 for controller’s node ID 2 can access floor 1, 2, and 3
(8) Option 2. Saved user assignment by selecting user range
Select user range to save the setting for several users that you have do the setting from previous step.
Select [Write Range] if you done selecting lift assignment for the user
.png)
5.User Operation
By this solution, to reach single floor, users do not have to press the elevator buttons; to reach public floors, users would still have to press the public floor’s elevator buttons. For example: the designated single floor is 13th floor and the public floors are 1st floor, lounge 4th floor and roof 16th floor. When this user swipe the RFID card, 13th floor’s elevator button will be pressed automatically, when if this user needs to go to public floor such as 4th floor, the user needs to press 4 to go to 4th floor; when if the user wants to go to 16th floor, the elevator will still be open at 13th floor first unless the user press it to cancel 13th floor or just let it open and back to close status.
6.User Operation
| Confirmation | Item | Check Content |
| ☐ | 1. | Check the device firmware (special firmware for active elevator calling) and station number configuration. |
| ☐ | 2. | Verify the wiring and floor number settings. |
| ☐ | 3. | Ensure that the 701ServerSQL parameters are edited to include floor output settings. |
| ☐ | 4. | Verify that the 701ClientSQL has floor editing configured. |
| ☐ | 5. | Check the 701ClientSQL for the F. Download Items to confirm the card reader station number. |