content
(Tick to jump directly to the content)
Step 2. Add Value to the SOR cards
2-1 Launch SOR SIM Card
2-2 Add Value to SOR-LAM Card
Step 3. Consumption & Balance Deduction
3-1 Unable to charge when card balance is insufficient
3-2 Successfully charging when balance is sufficient
Step 4. 701Server SQL Setting
Step 5. 701ClientSQL Graphic Animation Control
Step 6. Remote On-Site Monitoring
4. Requirement Chart
As the number of electric vehicles is increasing, EV charging station has become more common. SOYAL provides registered patent technology (Registered Patent No. I 365414) Mifare SOR (SOYAL OpenSystem Rules) an easier solution of EV charging station for everyday life. You can create your own prepaid card, setting up stored value device, and deduction device through Mifare SOR during initial setup and 701ServerSQL and 701ClientSQL for management and onsite remote monitoring through Graphic Animation Control feature.
1. Architecture Diagram
.png)
2. How it Works
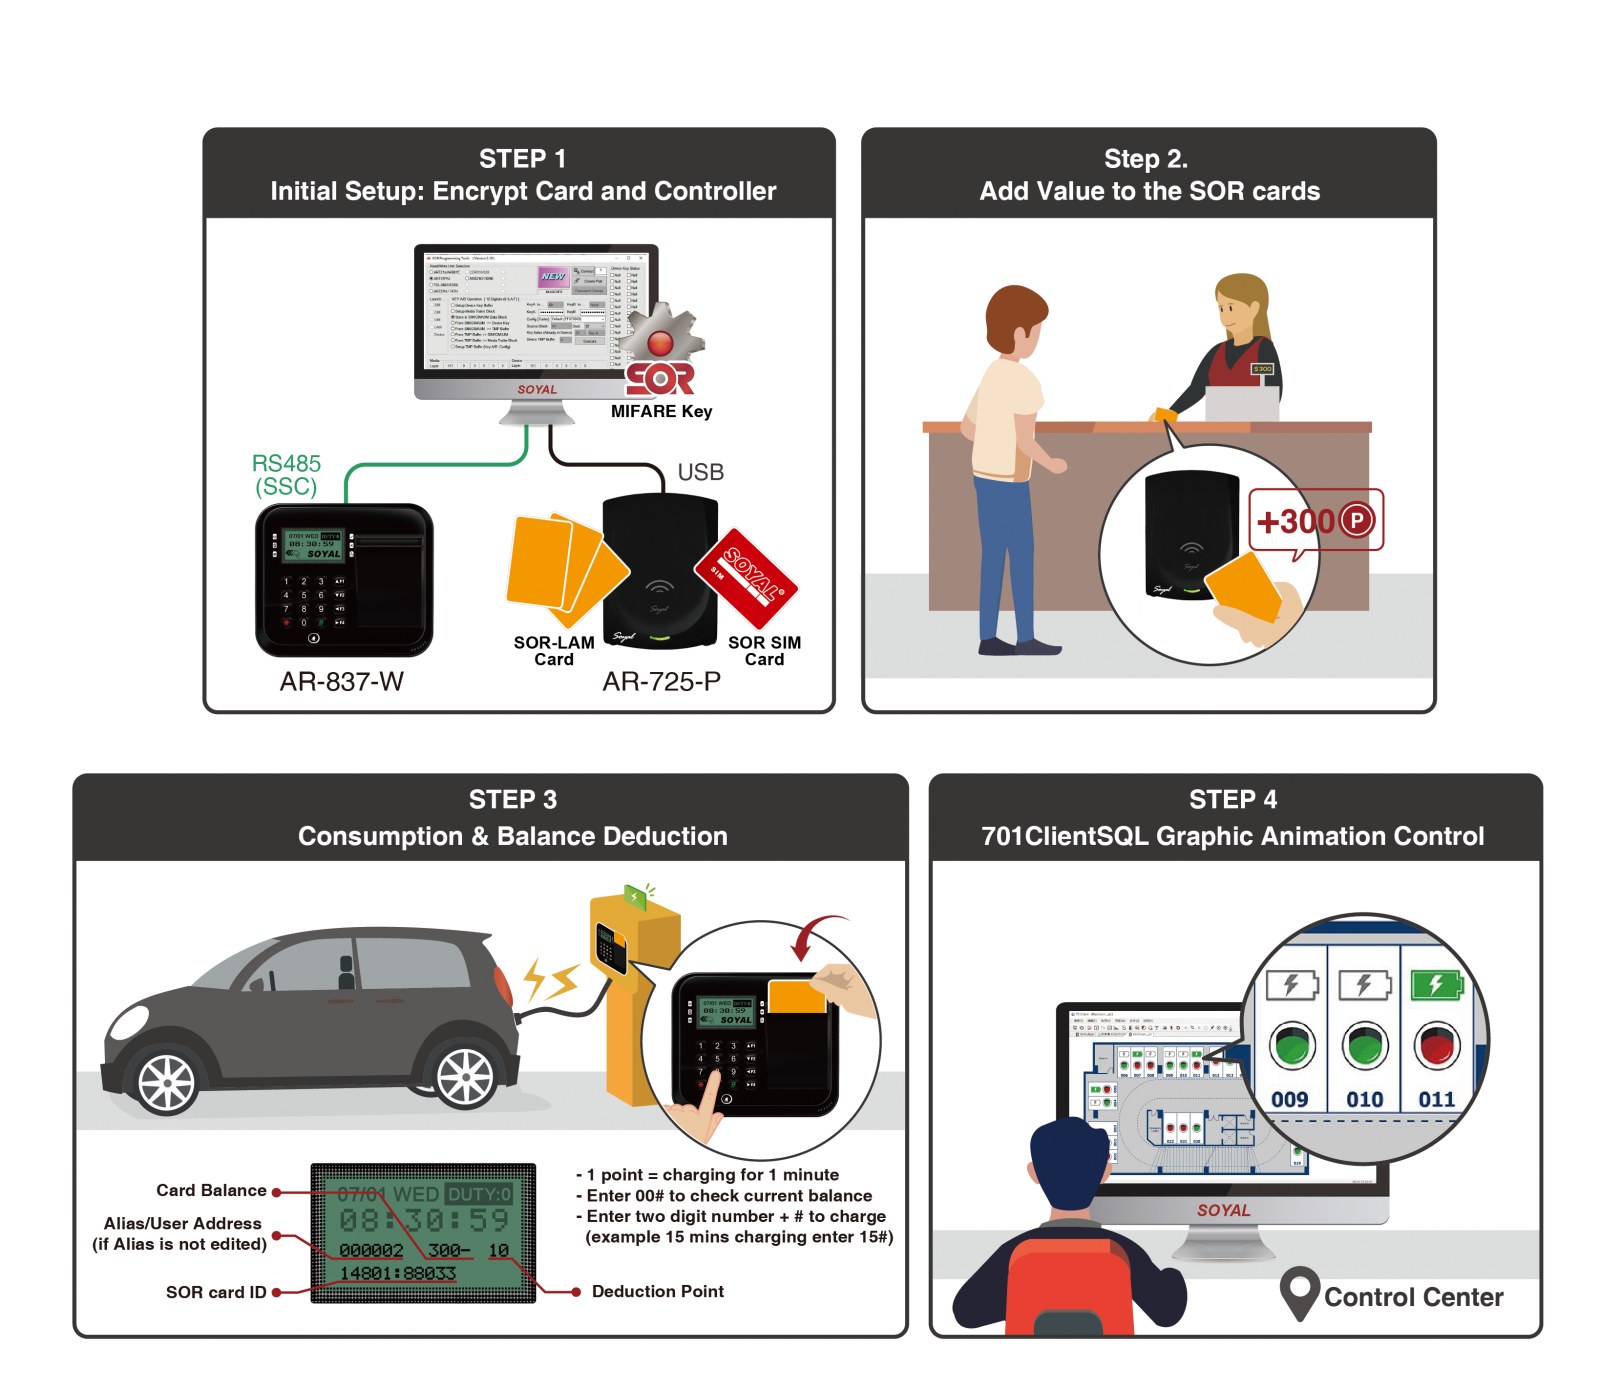
Step 1. Initial Setup – Encrypt Card and Controller(AR-837-W)
Initial setup includes AR-837-W setting and encrypting both hardware and cards. That way, only encrypted cards can be read on the deduction device for consumption purpose and only encrypted devices could have deduction feature.
To implement below step, please prepare Mifare SOR Programming Kit, hardware, and tags ready
Before starting the operating steps, please prepare:
1. SOYAL Software--Mifare Key ►Introduction and Download of MIFARE Key Software
2. MIFARE SOR Encryption Card and Device Editor ► AR-725-P Product Introduction
3. Point Deduction Device (Controller) ►AR-837-W Product Introduction
(4) Mifare Card ► Card Product Introduction
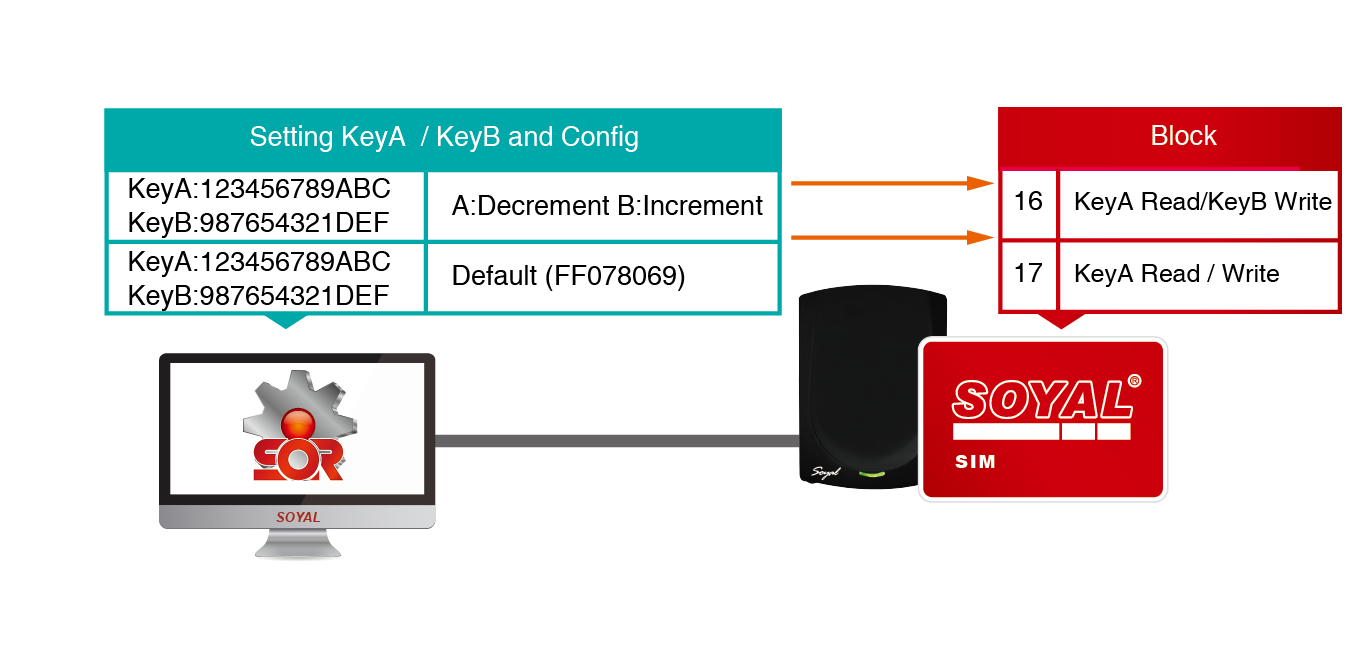
KeyA KeyB :
Key A / Key B is two 12 16 Hex value and Config Trailer composed.
- Key A=12 16 Hex value, 0-9 and A-F
- Key B=12 16 Hex value, 0-9 and A-F
- There ard two kind Config Trailer: A: Decrement, A:Increment (Default) and A: Decrement, B: Increment.
A: Decrement, A:Increment (Default): Read and write data before must be checked SOR card and the SOR controller the key A.
A: Decrement, B: Increment: Read data before must be checked SOR card and the SOR controller the key A. Write data before must be checked SOR card and the SOR controller the key B.
※ Note : Card and controller Data transfer required check Key A /Key B and distribution Code.
More detail about Mifare Key and distribution Code please refer to Mifare Key manual ► SOR & Mifare Key Manual

STEP 1 : Ending all SOYAL software and plug in AR-725-P's USB to PC open MIFAREKEY software.
STEP 2 : Selection COM Port.
STEP 3 : Selection controller item No. For example: AR-725-P.
- For all Enterprise E series controller reader / Home H series controller reader, please select the model name of AR721x/AR881E.
- For all Wiegand reader, please select the model name of AR737P/U
STEP 4 : Click "Connect" button to connect.
STEP 5 : If status bar show "Decice Login OK! " indicates successful connection
STEP 6 : Place SIM card to the AR-725-P the MIFARE software will show SIM icon.
STEP 7 : Selection "Store in SIM/CIM/UIM Data Block" write data to SIM/CIM/UIM block.
STEP 8 : Input the desired Key A / Key B (Key A=12 16 Hex value, Key B=12 16 Hex value).
STEP 9 : Selection A: Decrement, B: Increment in "Config [Trailer]".
STEP 10 : Selection 16 in "Dest" field ( Save Key A/ Key B to 16th Block).
STEP 11 : Press "Execute" button.
STEP 12 : If status bar show "Write KeyAB to SIM/CIM/UIM OK! " indicates that the data successfully written SIM card.
STEP 13 : Selection Config [Trailer] "Default(FF078069)" to set another Key A / Key B.
STEP 14 : Selection 17 in "Dest" field ( Save Key A/ Key B to 17th Block).
STEP 15 : Press "Execute" button.
STEP 16 : If status bar show "Write KeyAB to SIM/CIM/UIM OK! " indicates that the data successfully written SIM card.
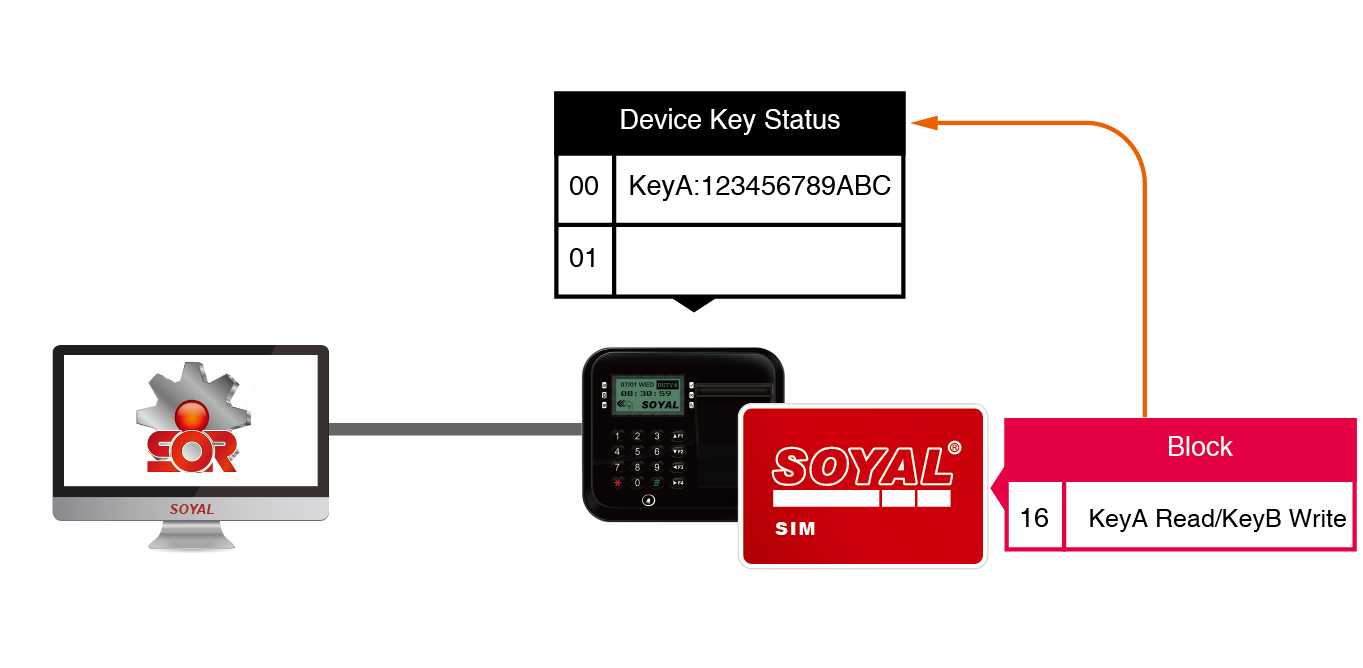
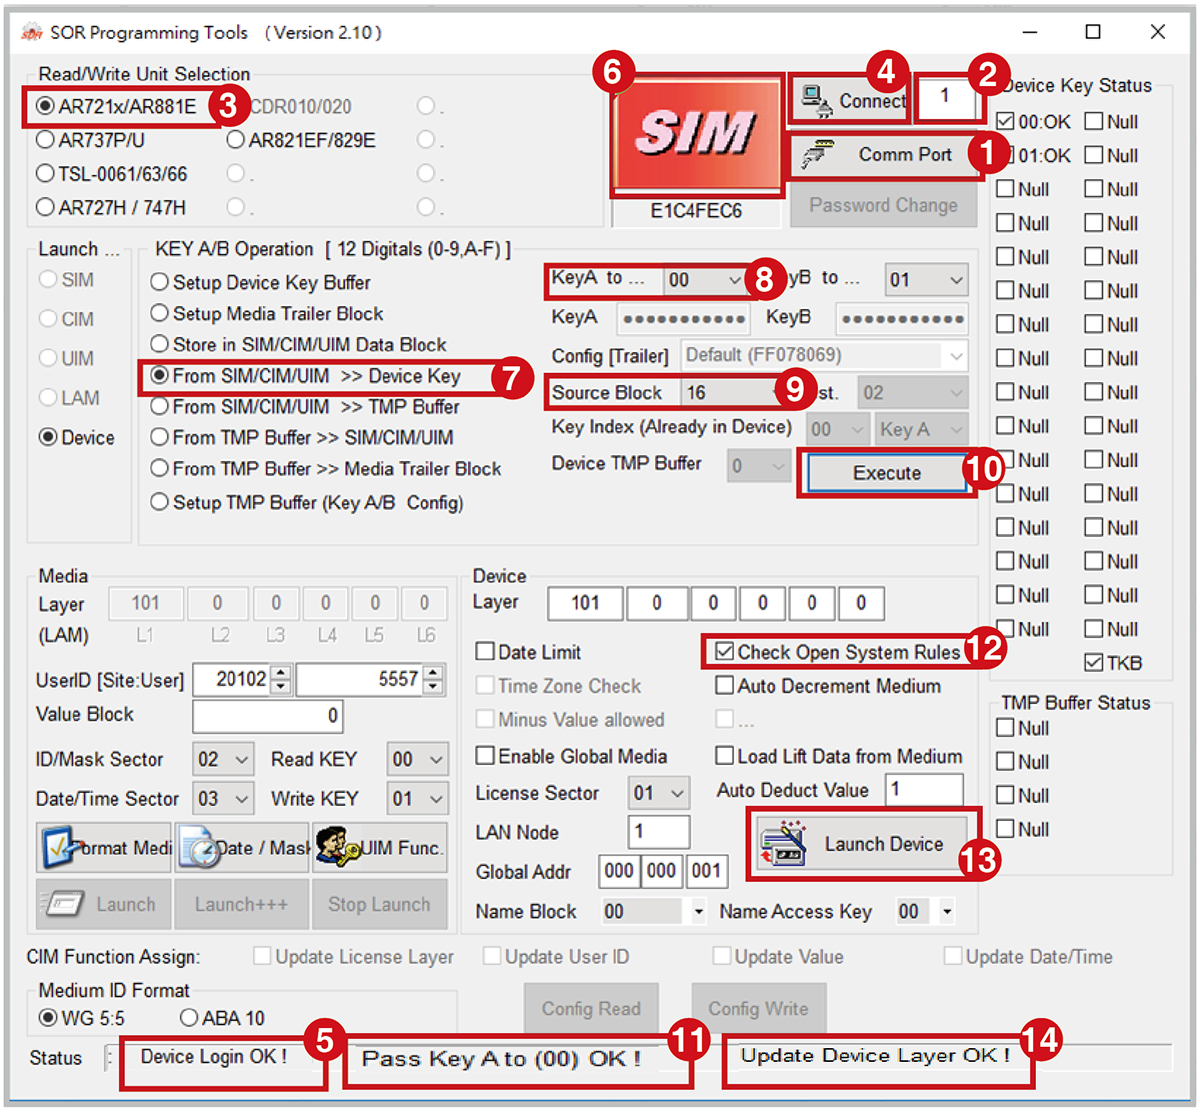
STEP 1 : Selection device COM Port (frequency of the device must be MIFARE).
STEP 2 : Selection device's node ID. For example: AR-837-W node ID is 001.
STEP 3 : Selection equipment item No. For example: AR-837-W .
- For all Enterprise E series controller reader / Home H series controller reader, please select the model name of AR721x/AR881E.
- For all Wiegand reader, please select the model name of AR737P/U
STEP 4 : Click "Connect" button to connect.
STEP 5 : If status bar show "Decice Login OK!" indicates successful connect to AR-837-W.
STEP 6 : Place UIM card on AR-837-W the MIFARE software will show UIM icon.
STEP 7 : Selection "From SIM/CIM/UIM>>Device Key" to copy UIM Key A to AR-837-W block 00.
STEP 8 : Selection 00 in "Key A" field.
STEP 9 : Selection 16 or 17 in "Source Block" field.
STEP 10 : Press "Execute" button.
STEP 11 : If status bar show "Pass Key A to (00) OK!" indicates that Key A has been successfully written AR-837-W block 00.
STEP 12 : Tick "Check open system rule".
STEP 13 : Press "Launch Device" to enable AR-837-W's SOR setting.
STEP 14 : If status bar show "Update Device Layer OK!" indicates indicates successful enable.
Now your device has been encrypted.

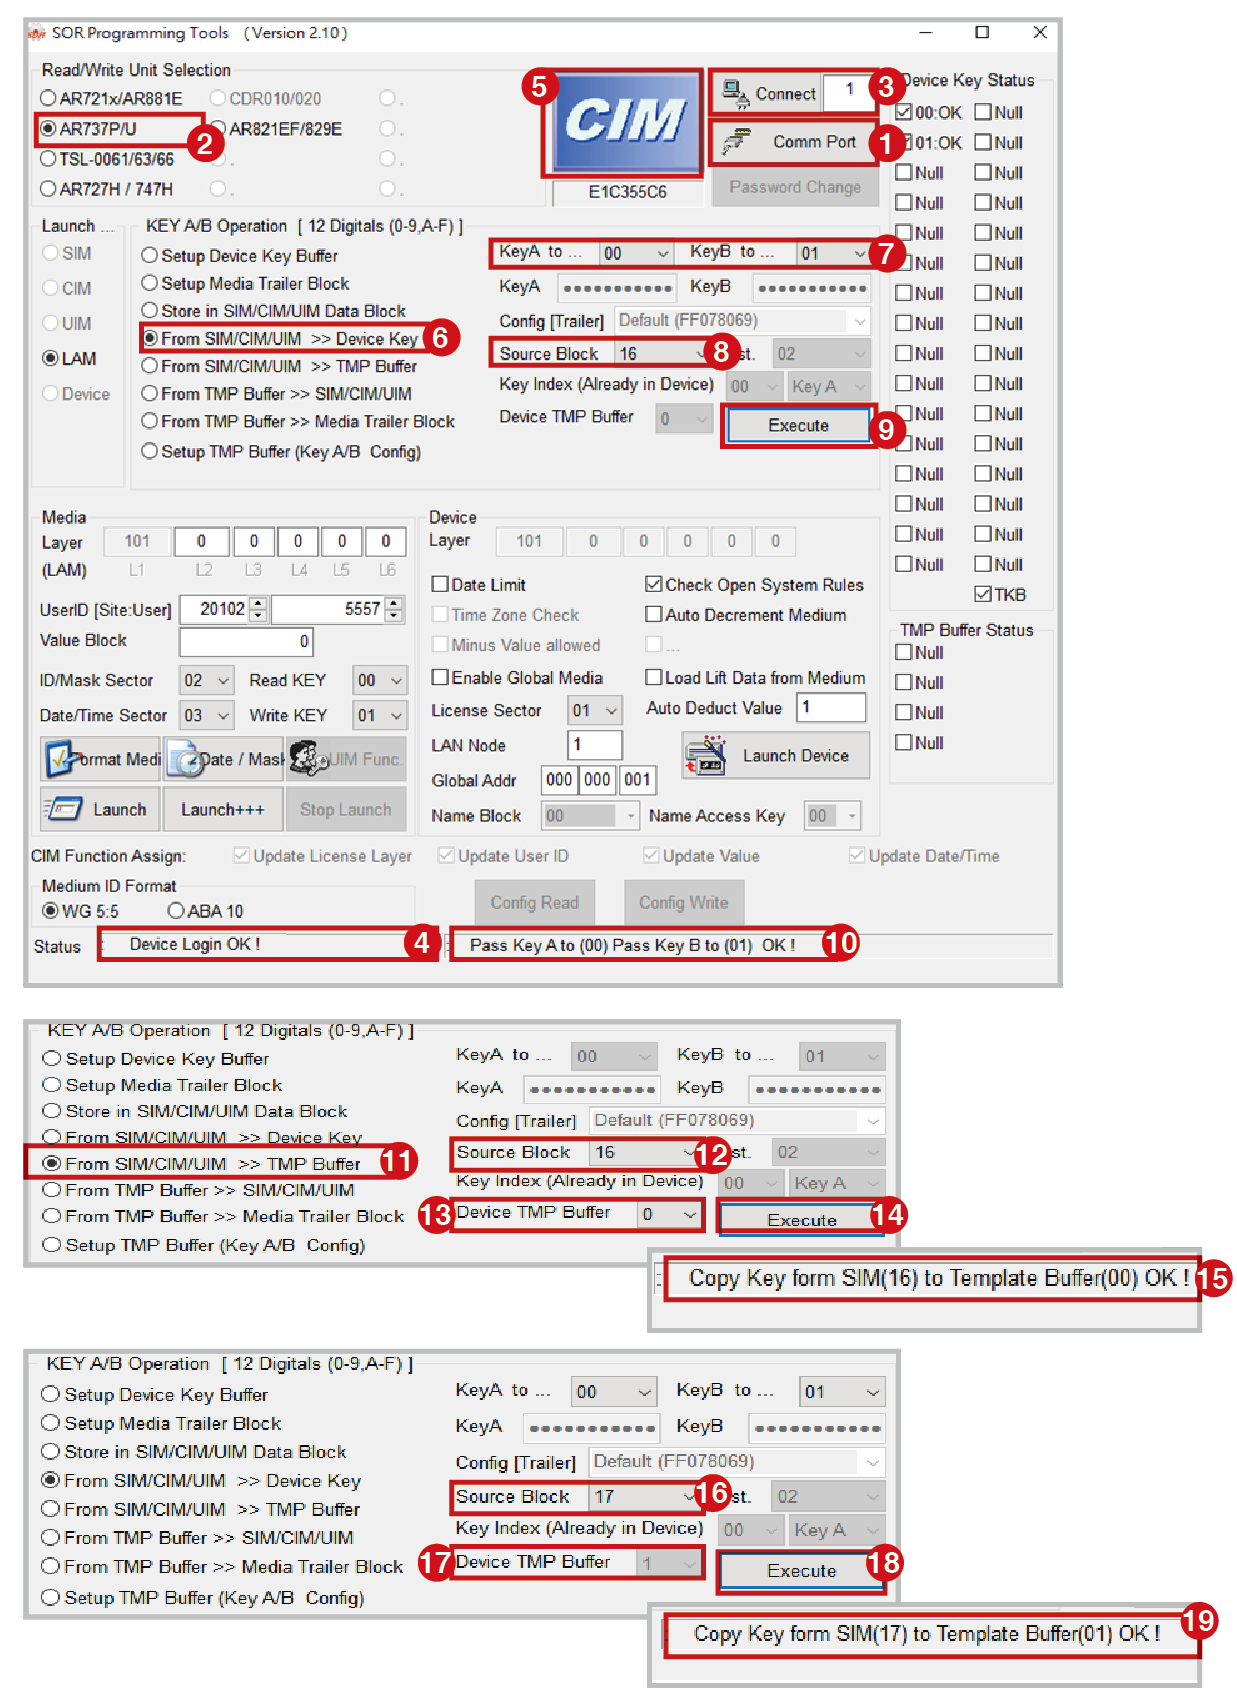
STEP 1 : Selection AR-737P COM Port.
STEP 2 : Selection controller item No. For example: AR-725-P.
- For all Enterprise E series controller reader / Home H series controller reader, please select the model name of AR721x/AR881E.
- For all Wiegand reader, please select the model name of AR737P/U
STEP 3 : Click "Connect" button to connect
STEP 4 : If status bar show "Decice Login OK! " indicates successful connection.
STEP 5 : Place CIM card on AR-725-P the MIFARE software will show CIM icon.
STEP 6 : Selection "From SIM/CIM/UIM>>Device Key" to read CIM card data and write into AR-725-P.
STEP 7 : To Select 00 in "Key A" field and select 01 in "Key B" field that is mean CIM card Key A be saved into AR-725-P block 00 and CIM card Key B be saved into AR-725-P block 01.
STEP 8 : Selection 16 or 17 in "Source Block" field.
STEP 9 : Press "Execute" button.
STEP 10 : If status bar show "Pass Key A to (00) Pass Key B to (01)OK!" indicates Key A / Key B has been successfully copied to AR-725-P block 00 and block 01.
STEP 11 : Selection "From SIM/CIM/UIM>> TMP Buffer"
STEP 12 : Selection 16 in "Source Block" field.
STEP 13 : Selection 00 in "Device TMP Buffer" field.
STEP 14 : Press "Execute" button.
STEP 15 : If status bar show "Copy Key from SIM(16) to Template Buffer(00) OK !" indicates UMI card block 16 has been successfully copied to Template Buffer 00.
STEP 16 : Selection 17 in "Source Block" field.
STEP 17 : Selection 01 in "Device TMP Buffer" field.
STEP 18 : Press "Execute" button.
STEP 19 : If status bar show "Copy Key from SIM(16) to Template Buffer(00) OK !" indicates UMI card block 17
Now your card has become SOR-LAM Card (encrypted)
Step 2. Add Value to the SOR cards
After the initial setup is finished, all of the encryption has been done and the steps left is to add value (points) for LAM-SOR card. One point is equivalent to one minute of electricity usage, that means if you add 100 points and only charge for one hour (60minutes), SOR tag still have 40 minutes left for next usage.
STEP 1 : Ending all SOYAL software and plug in AR-725-P's USB to PC open MIFAREKEY software.
STEP 2 : Selection COM Port.
STEP 3 : Selection controller item No. For example: AR-725-P.
- For all Enterprise E series controller reader / Home H series controller reader, please select the model name of AR721x/AR881E.
- For all Wiegand reader, please select the model name of AR737P/U
STEP 4 : Click "Connect" button to connect.
STEP 5 : If status bar show "Decice Login OK! " indicates successful connection
STEP 6 : Place SIM card to the AR-725-P the MIFARE software will show SIM icon.
STEP 7 : Selection "Store in SIM/CIM/UIM Data Block" write data to SIM/CIM/UIM block.
STEP 8 : Input the desired Key A / Key B (Key A=12 16 Hex value, Key B=12 16 Hex value).
STEP 9 : Selection A: Decrement, B: Increment in "Config [Trailer]".
STEP 10 : Selection 16 in "Dest" field ( Save Key A/ Key B to 16th Block).
STEP 11 : Press "Execute" button.
STEP 12 : If status bar show "Write KeyAB to SIM/CIM/UIM OK! " indicates that the data successfully written SIM card.
STEP 13 : Selection Config [Trailer] "Default(FF078069)" to set another Key A / Key B.
STEP 14 : Selection 17 in "Dest" field ( Save Key A/ Key B to 17th Block).
STEP 15 : Press "Execute" button.
STEP 16 : If status bar show "Write KeyAB to SIM/CIM/UIM OK! " indicates that the data successfully written SIM card.

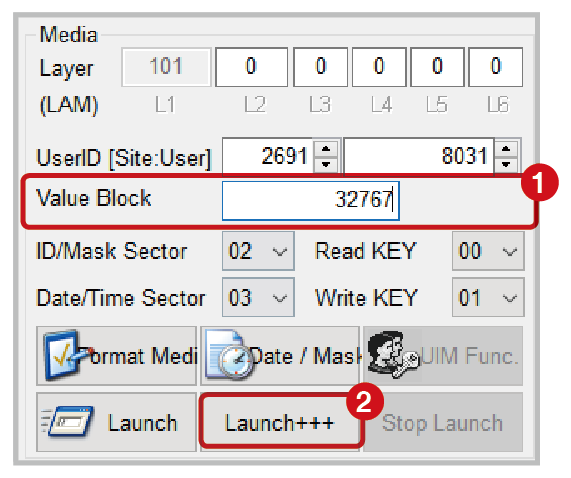
STEP 1 : After putting the SOR-LAM Card, current balance will show on Value Block section. Enter final balance.
STEP 2 : After completing the settings, click the [Launch+++] button to update the remaining balance of the points on the card.
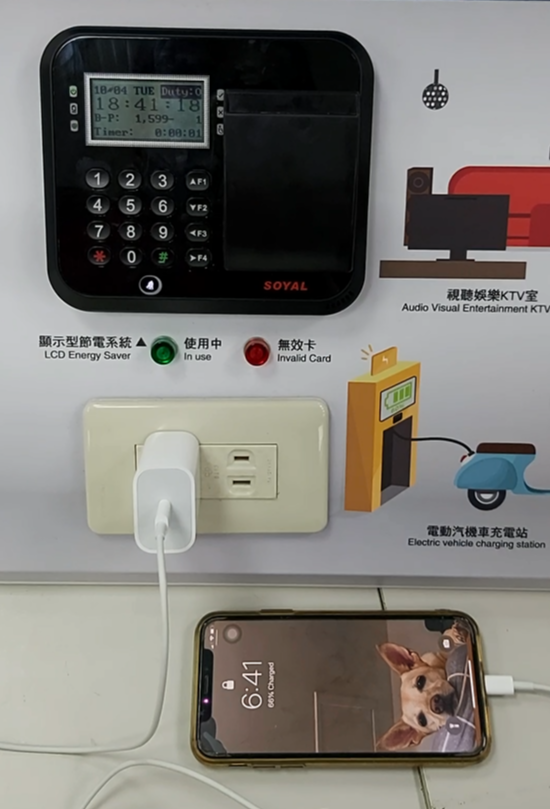
Step 3. Consumption & Balance Deduction
When you insert a card to AR-837-W it will show several information on the LCD such as
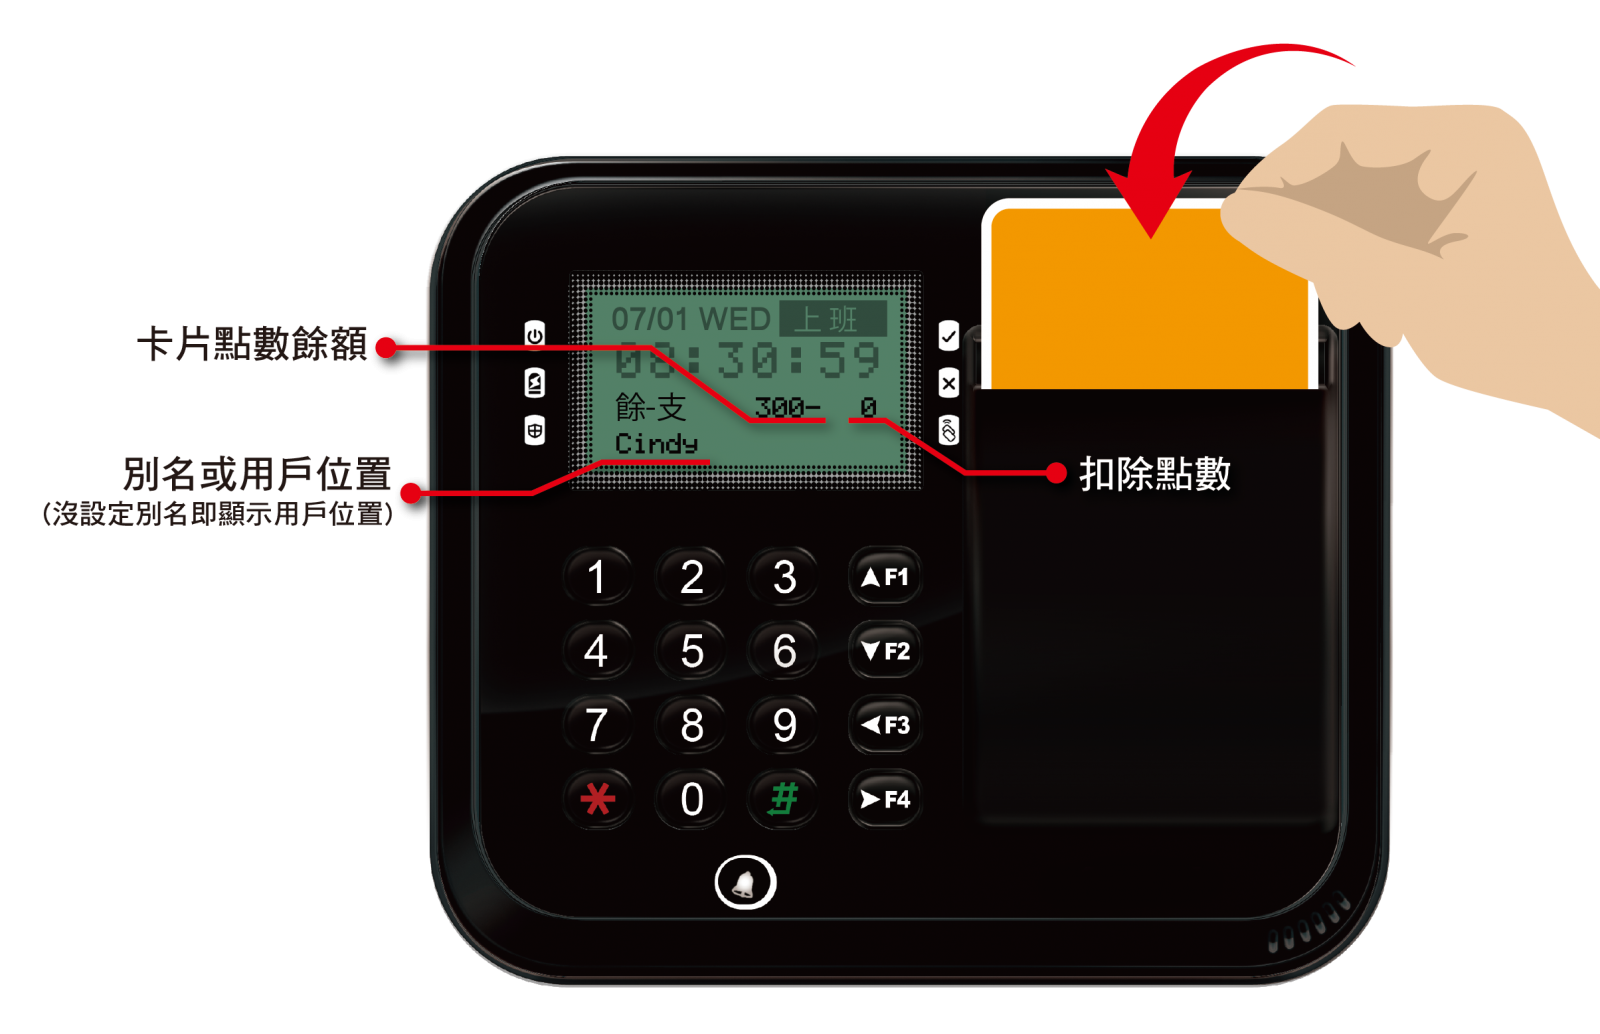
Note:
Example: deduction for 15 minutes enter --> 15#
- When you inserted the card, it will show current balance or else enter 00# to check card balance
3-1 Unable to charge when card balance is insufficient
When you card has insufficient, after entering how many minutes you want to charge your vehicle, the LCD will show insufficient balance on the LCD. At the same time 701ClientSQL will also show the correspondent event log.

Display on 701ClientSQL Event log
.png)
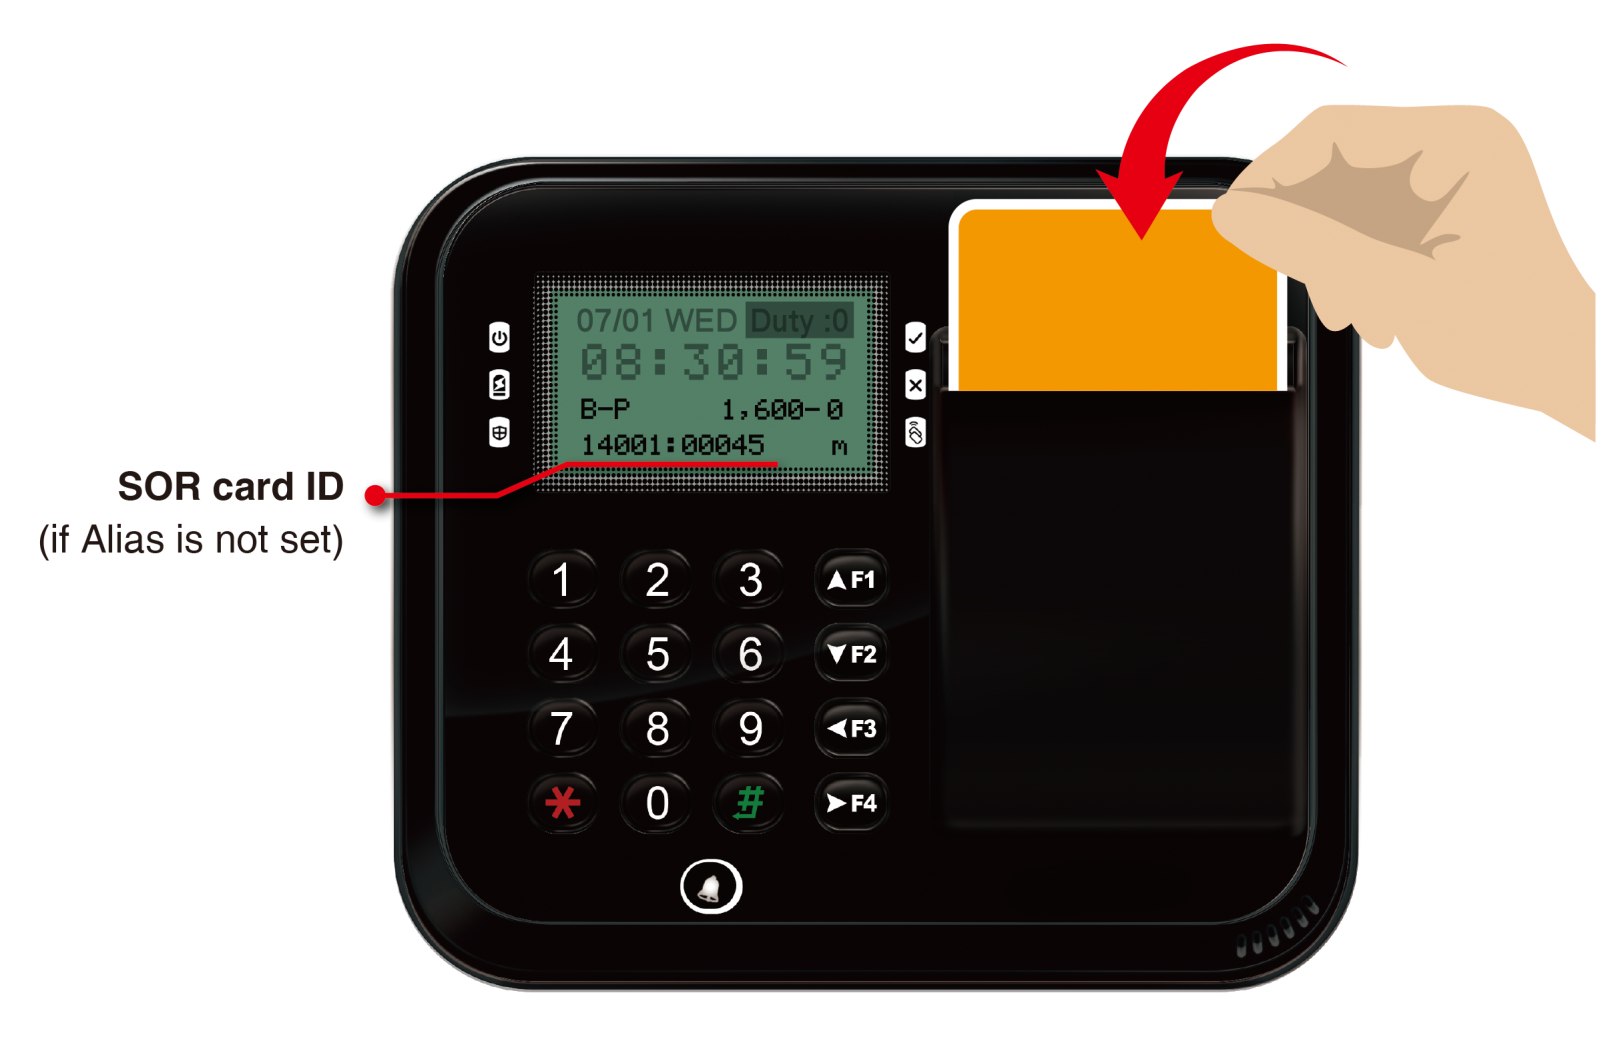
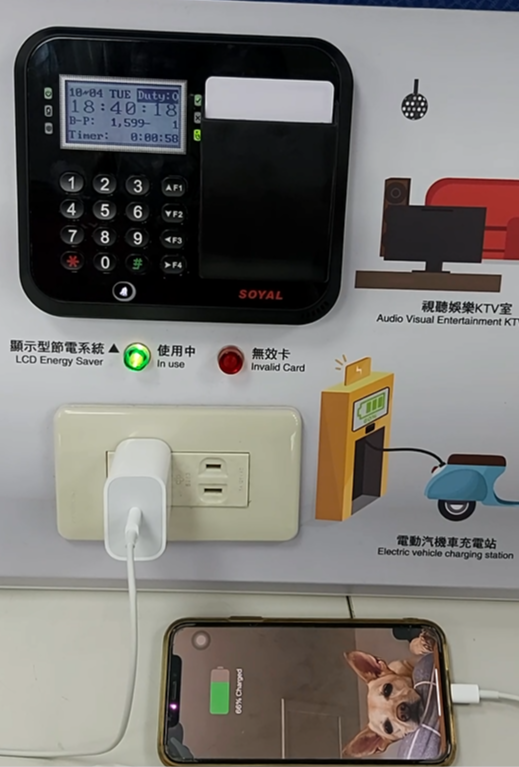
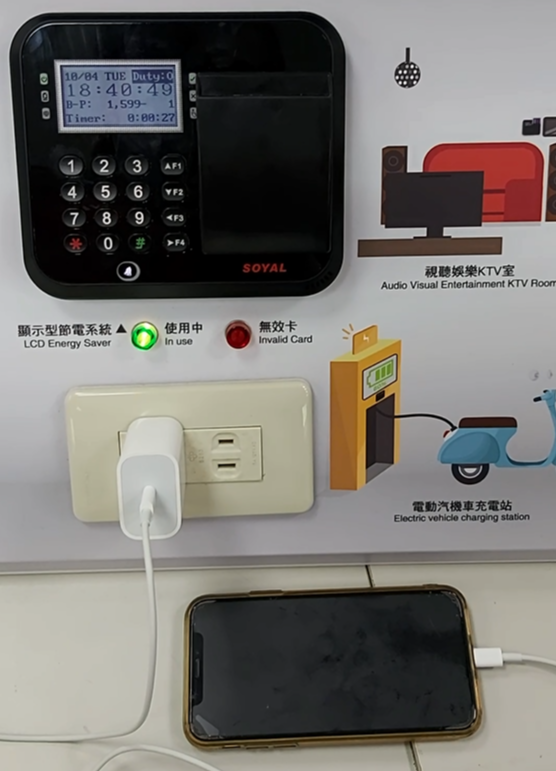
3-2 Successfully charging when balance is sufficient
When you card has sufficient balance, after entering how many minutes you want to charge your vehicle, the LCD will show Balance Remaining and Current Consumption
Timer will also show the countdown on how many minutes left charger will keep on charging (relay ON). At the same time you will see that charger is working.
Example: A card that has a balance of 1600 Points available for deduction, enter 01# to deduct 1 point=1minute (example using smartphone charging)
Display on AR-837-W LCD screen :
B= Balance remaining for next deduction (916 Points)
P= Point deduction for current deduction
Timer: show how much time (hour/min/sec) left for until charging is finished
Display on 701ClientSQL Event log

After finished deducting the balance on the card, user can take out the card and controller will keep on charging and counting the time remaining until charging is finished.
Display on 701ClientSQL Event log

- Consumption & Balance Deduction full video

- Mifare Offline Consumption Example by LCD Screen Energy Saver AR-837WD
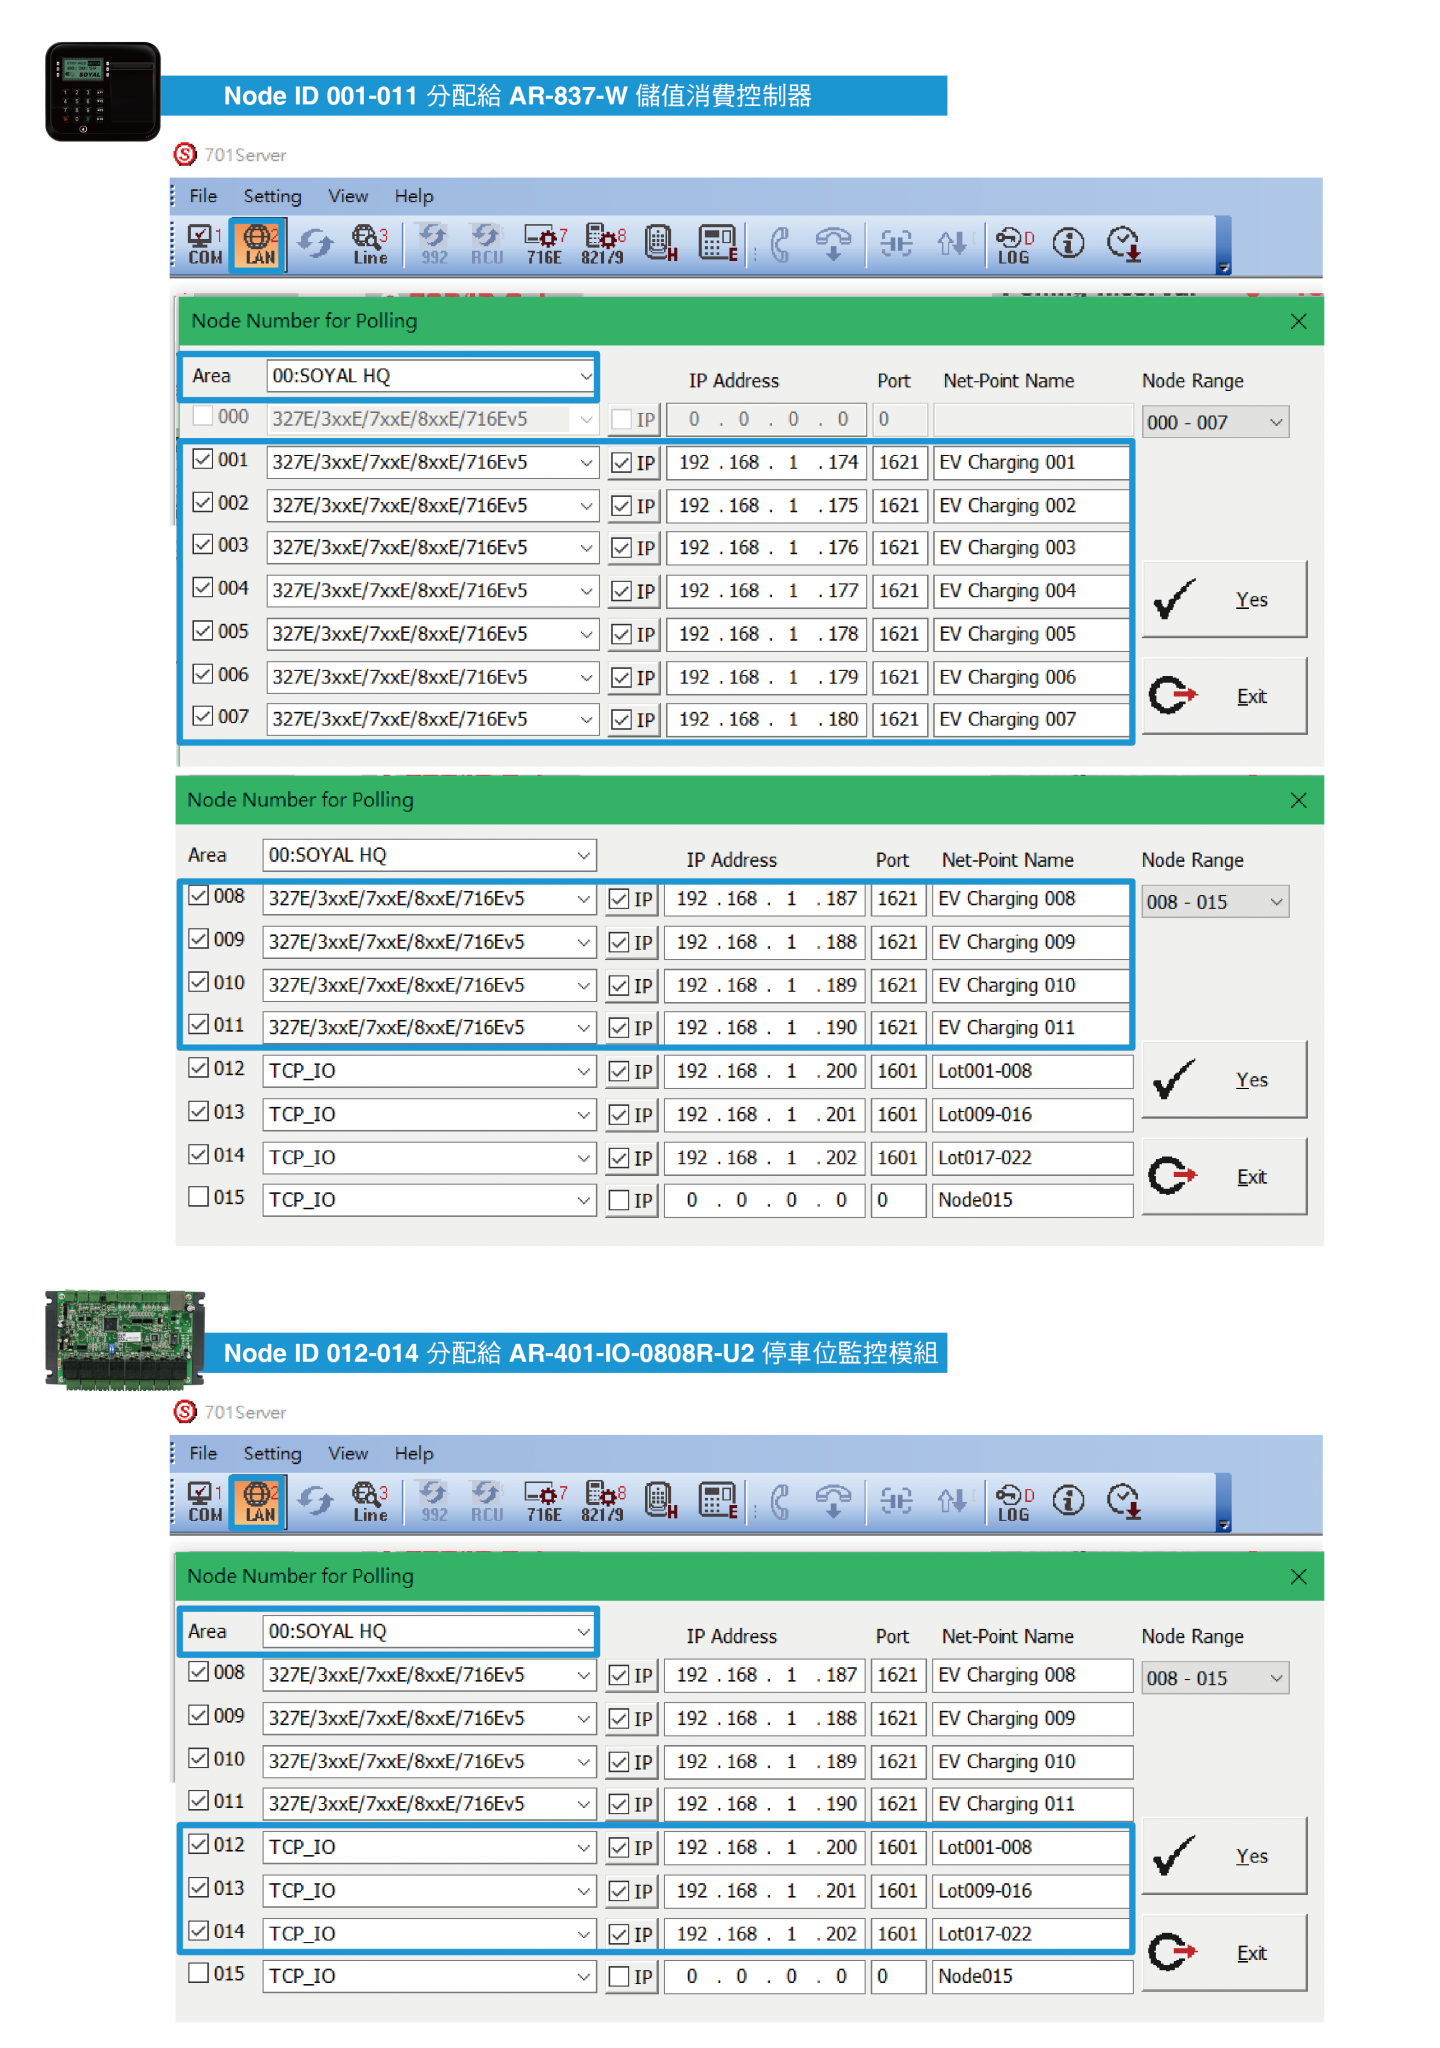
Step 4. 701Server SQL Setting
-
Node ID 001-011 is assigned for AR-837-W Balance Deduction Controller
-
Node ID 012-014 is assigned for AR-401-IO-0808R-U2 Parking Space Monitoring Module
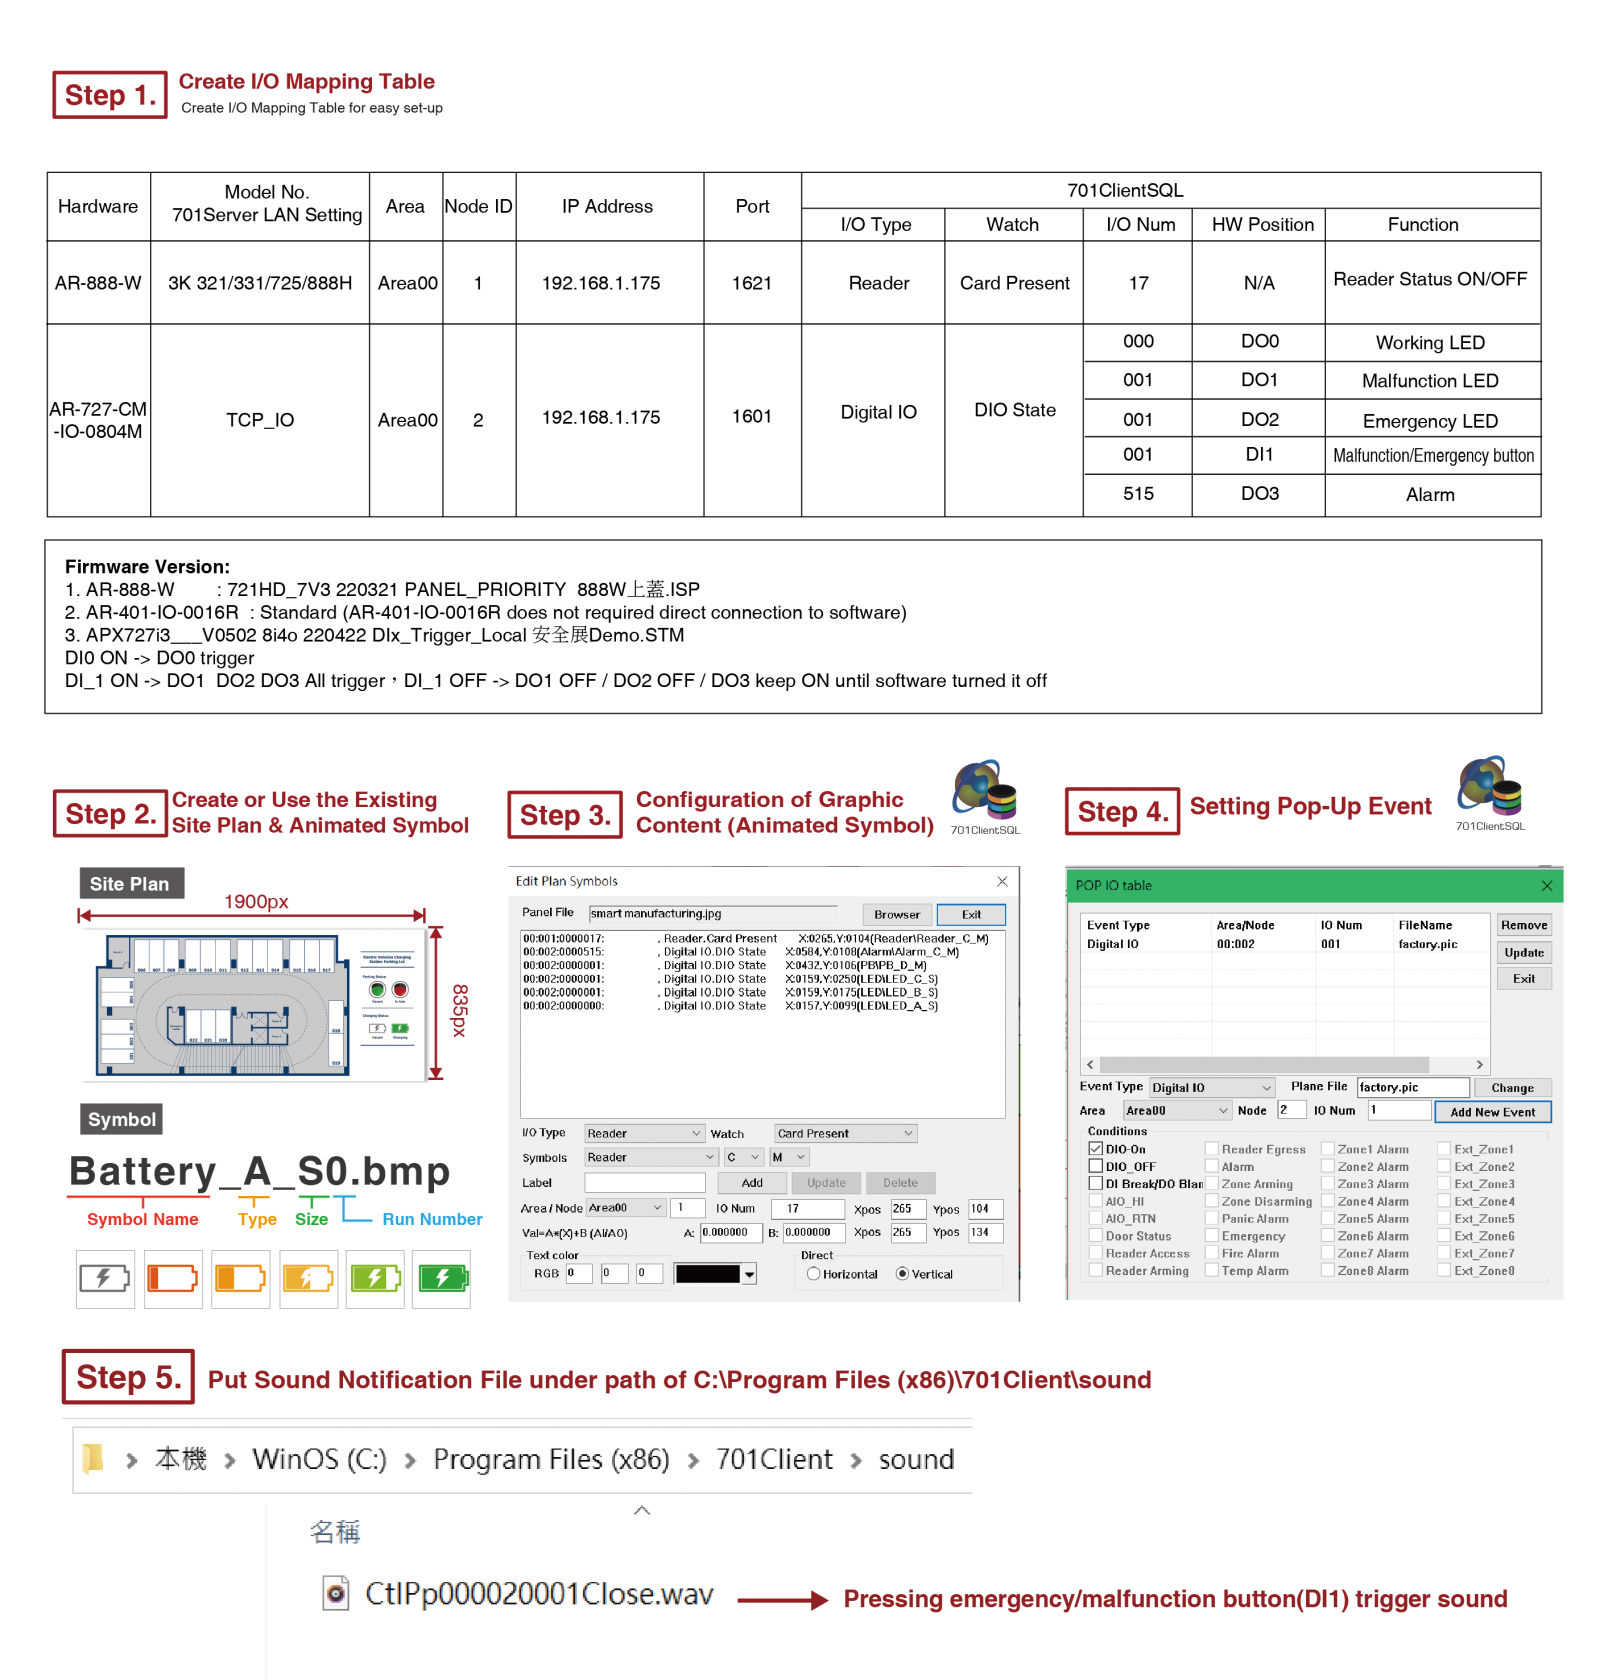
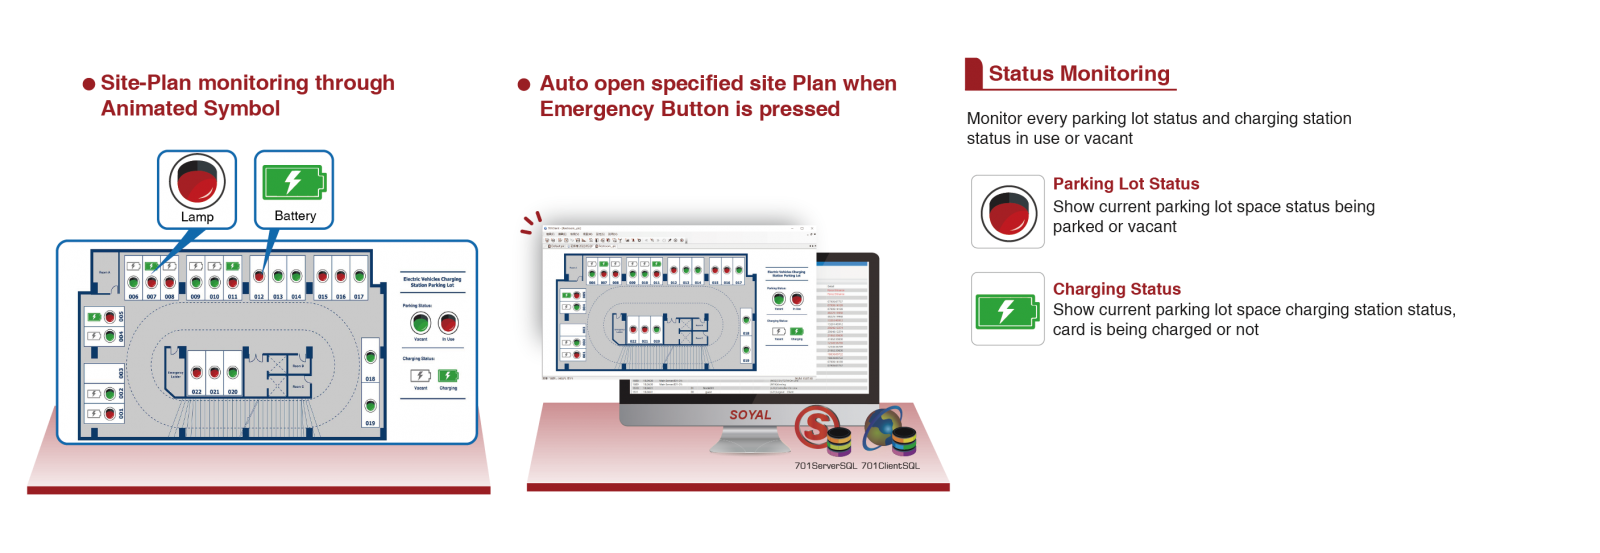
Step 5. 701ClientSQL Graphic Animation Control
Step 6. Remote On-Site Monitoring
4. Requirement Chart
| Classify | Picture | Name | Version | Quantity | RemarkRemark |
| Software | Real-time Resident Core Software for hardware communcation and TCP-Link Server 701Server SQL | 701ServerSetup 10v5 230718.exe and after | 1 |
| |
| Access Control and Graphic Animation Software 701Client SQL | 701ClientSetup 10v5 230723.exe and after | 1 | |||
| Mifare SOR Programming Kit (Tools) |  | Mifare Key | SOYAL Device Tools | 1 | Download SOYALDeviceTools to obtain Mifare Key software, use during initial setup of hardware and cards encryption and to add cards value |
| Mifare SOR Programming Kit (Programmer) | MIFARE Card Programmer AR-725-P | 1 | Mifare encryption for hardware and cards encryption, add cards value | ||
| Mifare SOR Programming Kit (Authorization Card) |  | AR-TAGSIM (SOR SIM Card) | 1 | AR-TAGSIM for hardware and cards | |
| Hardware | 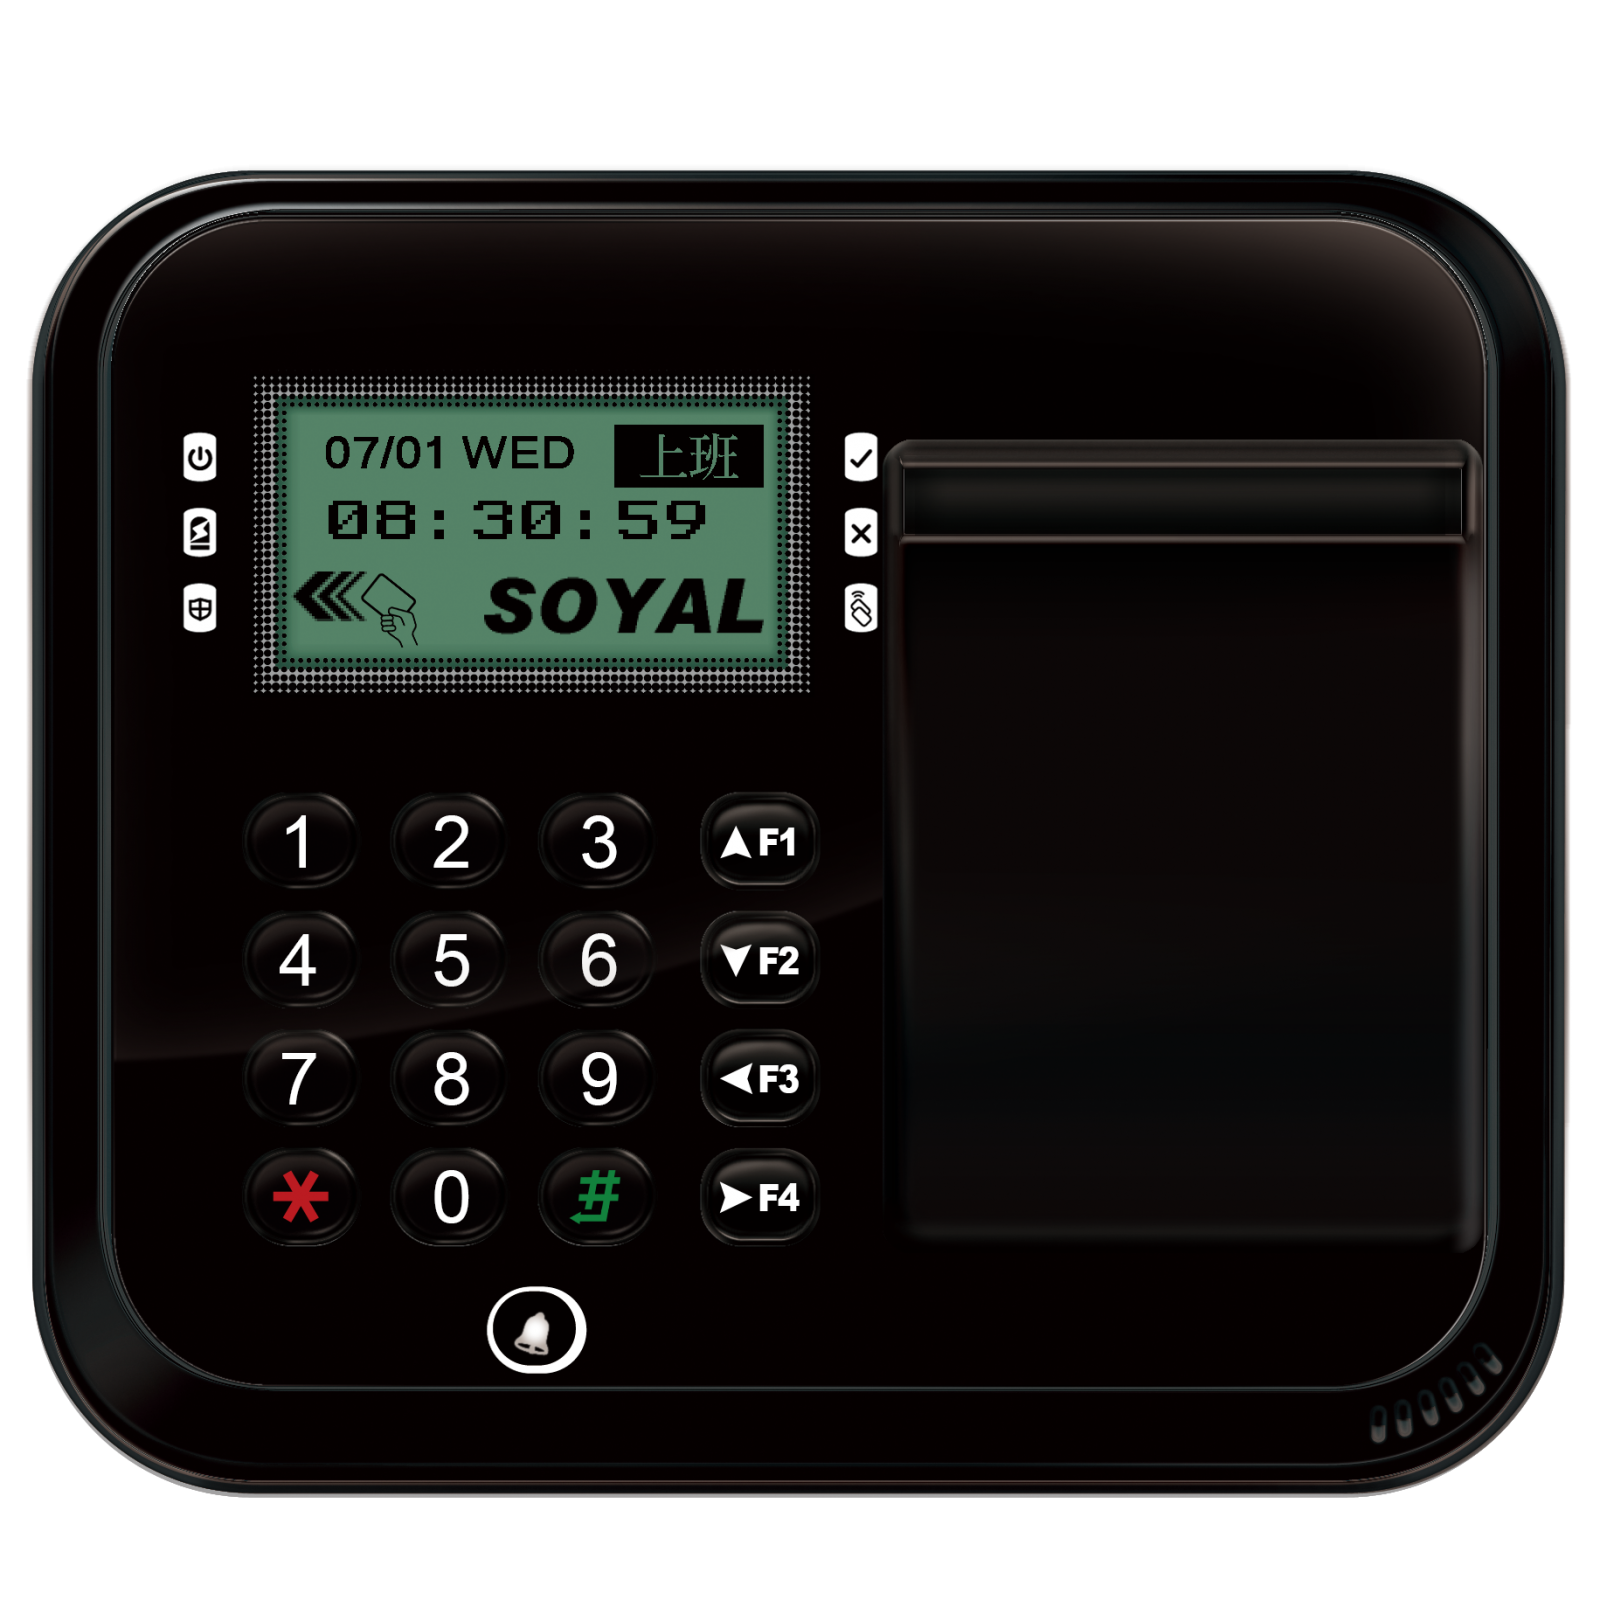 | LCD Card Energy Saver AR-837-W | 中文: APS837E____V0404_220930 CARD_HOLDER 鍵盤按兩位數及井為扣點分鐘數.STM
EN: APS837E____V0404_220930 CARD_HOLDER Keypad press two digit number and # deduct points in minutes.STM | 1 | Deduction device with card holder feature, monitor Charging Station in use / vacant |
| Peer-to-Peer I/O with 8DI and 8DO over TCP AR-401-IO-0808R-U2 | APX727i3___V0503 8i8o 220525 DIx_DOx_LEVEL.STM | 3 | Parking Status in use / vacant | ||
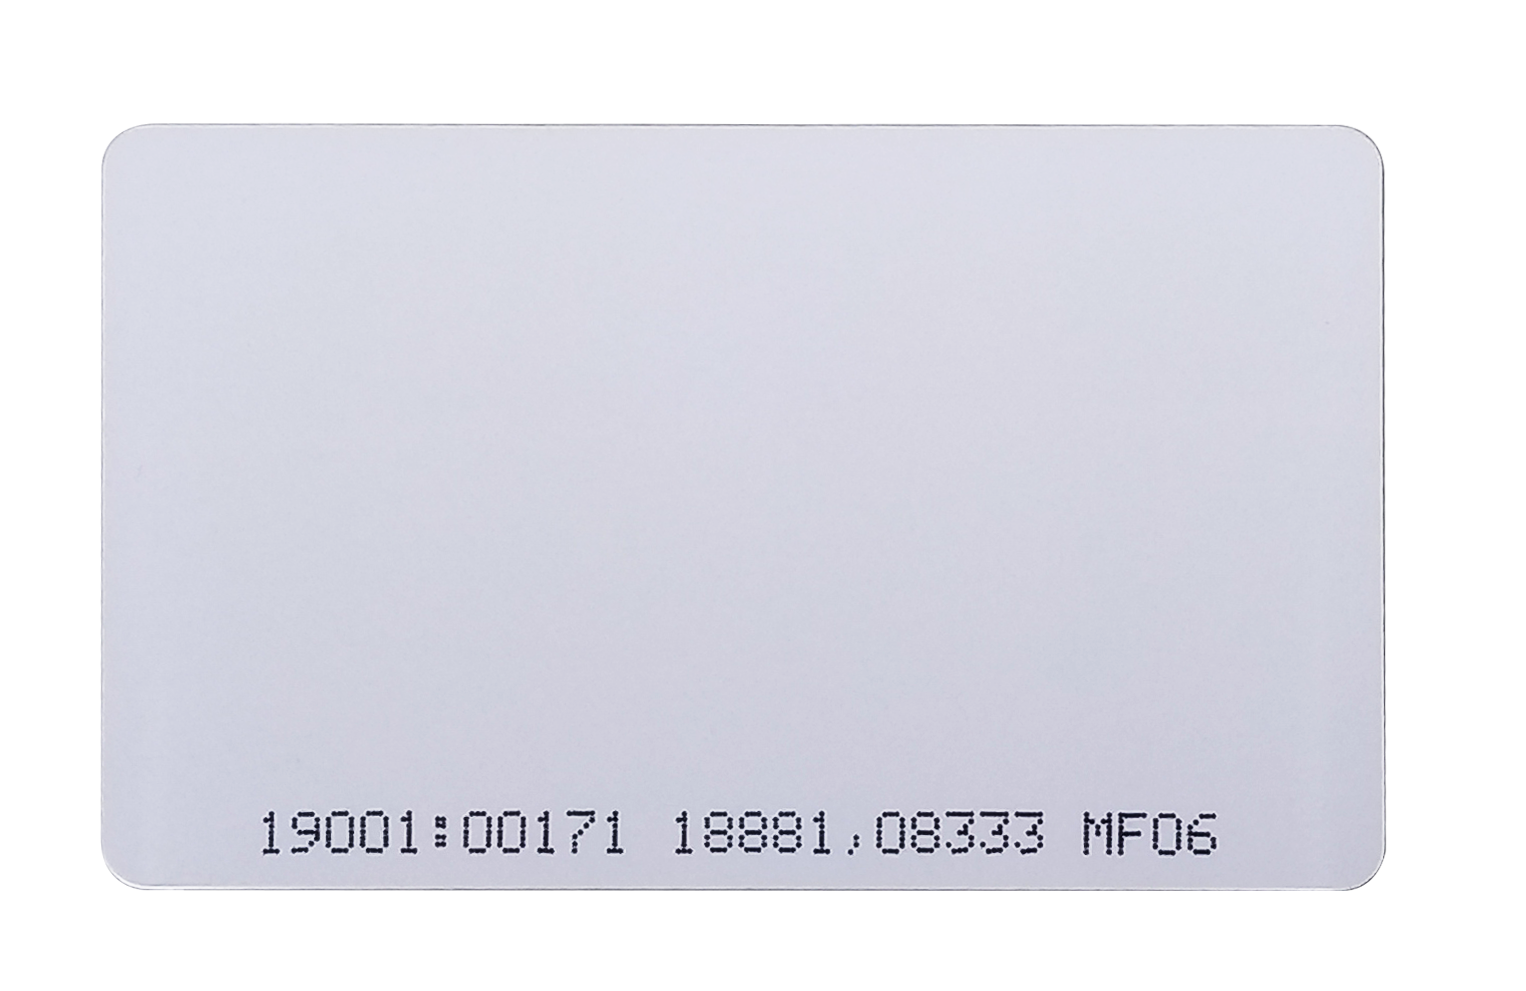 | AR-TAG | N/A | N/A | Prepaid card | |
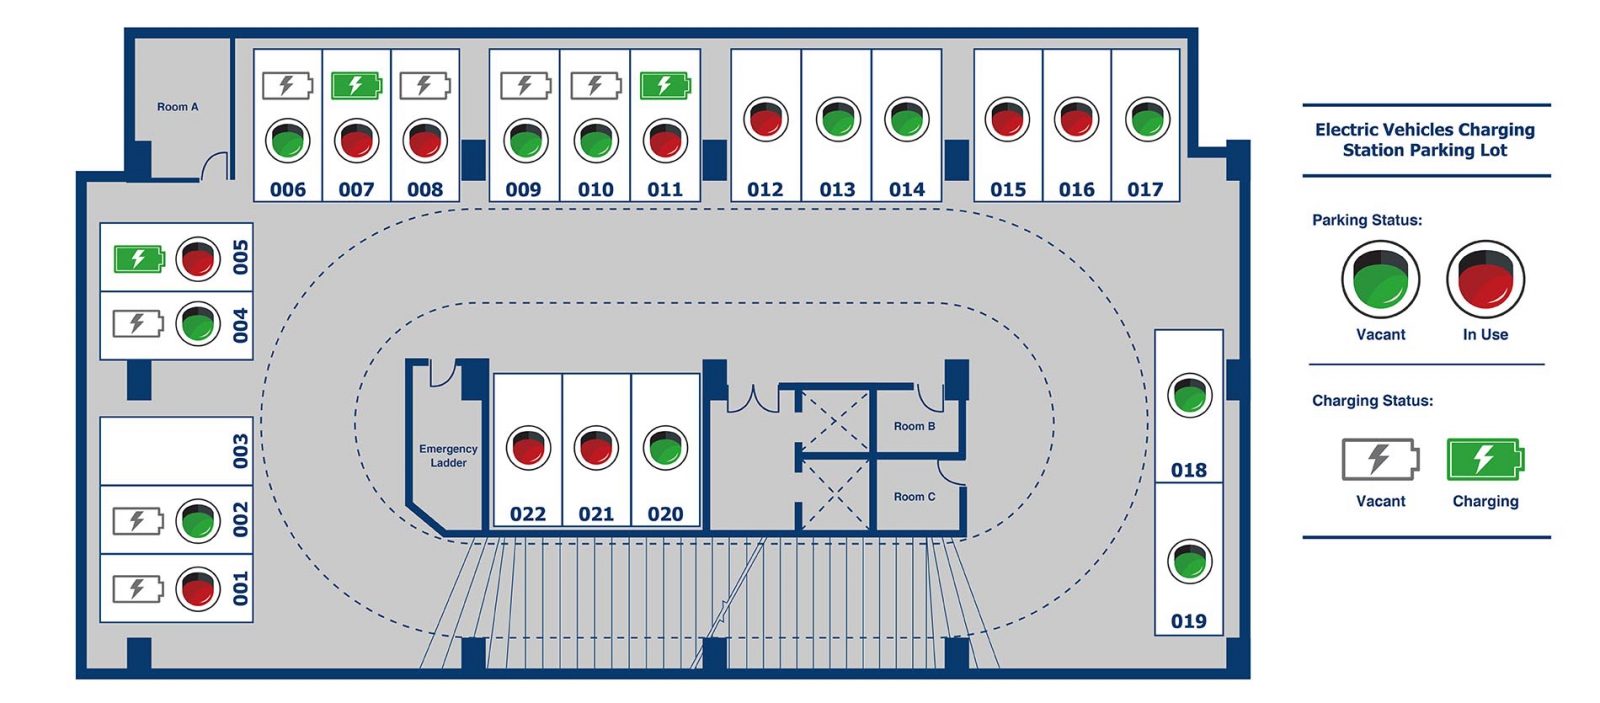
| Site Plan |
| Electric Vehicles Charging Station Site Plan | N/A | 1 |