Serial NO. : S00308007-EN
Date of Editing : 2022-10-07
Questions : How to set up user access authorization of lifts of several buildings?
Introduction :
In the case of multi-building configuration, e.g. community / commercial buildings, it is common that the user required to have authorization of getting access at different lifts and floors in the meanwhile, it is available to integrate the Node ID of Lift Control Panel AR-401-IO-0016R to achieve this function.
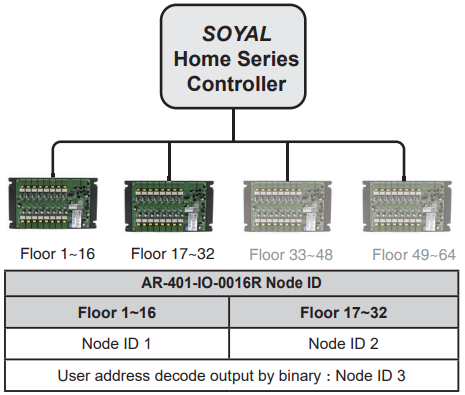
In basic configuration, each AR-401-IO-0016R will be set with Node ID 001, to control output 01-16. It will cause the operator needs to maintain plenty of access floor documents, please refer to Method2.
Utilize advanced method1 could solve this problem efficiently, while integrating the AR-401-IO-0016R Node ID from 1 to 5(3 is for specified used), it is available to control output 01-64 simultaneously, and only have to maintain one document, so that we will never update wrong data to controllers.
*This document will only provide the operation procedure, details of parameter setting please refer to the manual of 701ClientSQL – Chapter11. Lift Control.
Relevant FAQ >>Why lift control panel AR-401-IO-0016R has non-response?
Method1. Integrate the Node ID of AR-401-IO-0016R Control Panels
Introduction:
Firstly, we need to understand the lift configuration of SOYAL controller.
H series controller is capable of connecting two lift control panels of AR-401-IO-0016R, it is available to set Node ID of control panel via DIP Switch, totally 32 floors can be controlled at the same time.
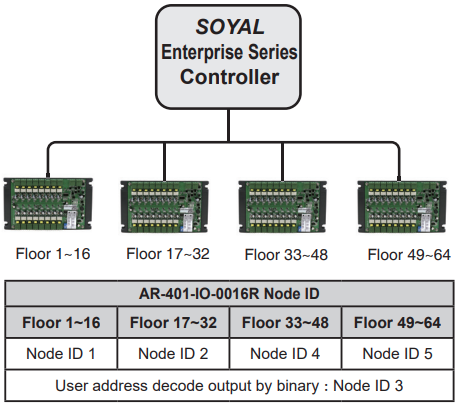
E series controller is capable of connecting four AR-401-IO-0016R, totally 64 floors can be controlled simultaneously.
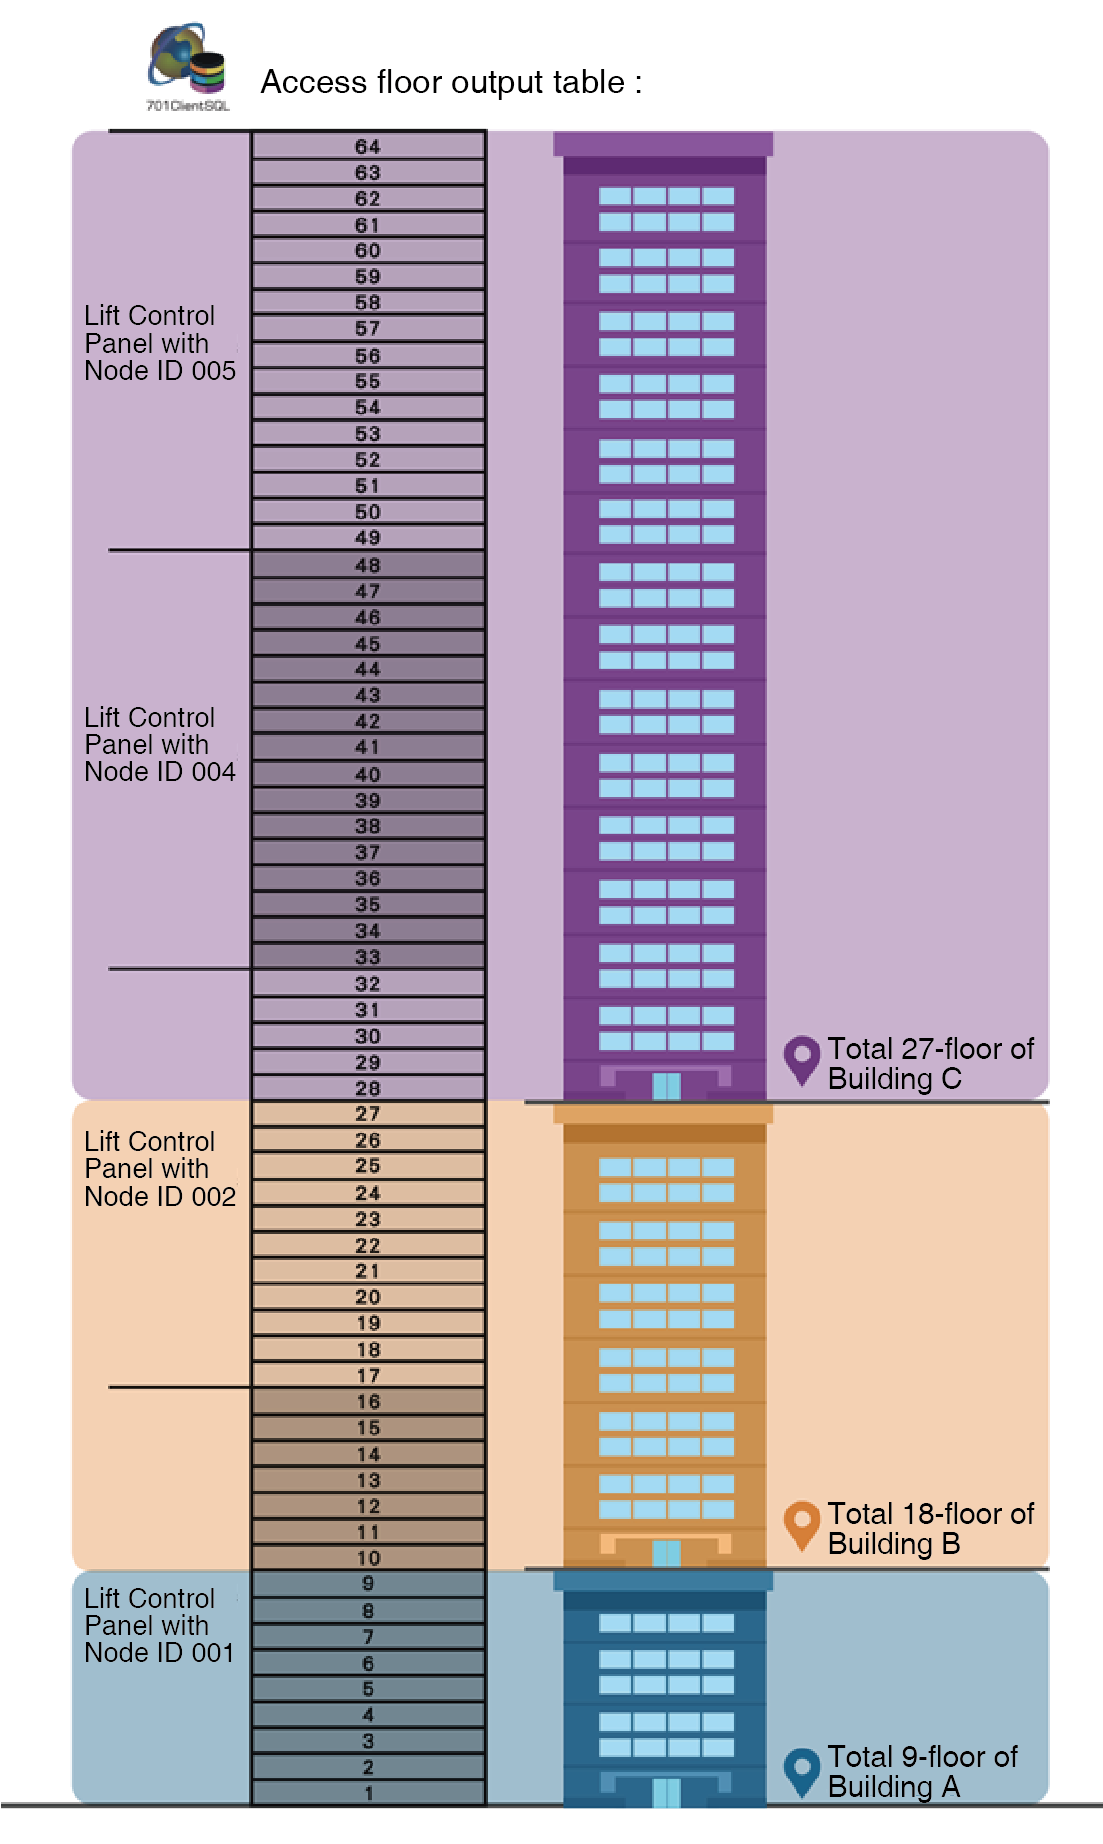
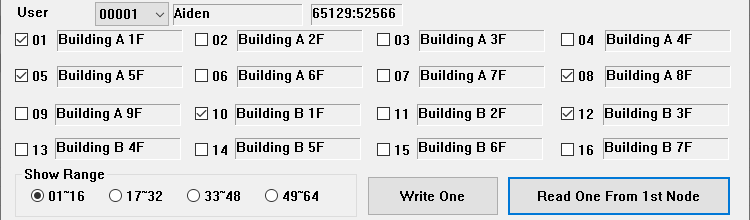
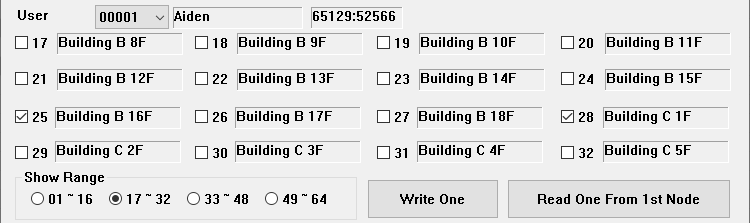
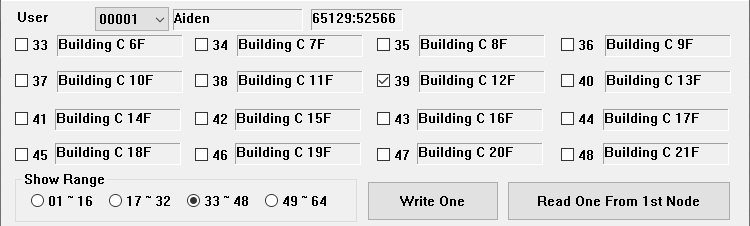
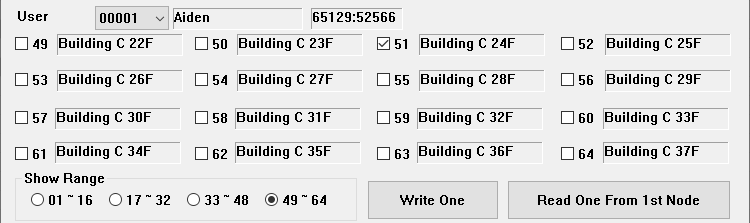
EX: The community has three buildings, A building with 9-floor, B building with 18-floor, C building with 27-floor, totally 64 outputs. One user required to have the authorization to get access on 1F/5F/8F of A building, 1F/3F/16F of B building, 1F/12F/24F of C building.
In this case, we need to use E series controller to control AR-401-IO-0016R for totally 64 outputs, the AR-401-IO-0016Rs will be assigned with Node ID 1/2/4/5, then it will be available to update one same data to three E series controllers.
Relevant Product:
| Name | Quantity |
| AR-725-E | 3 |
| AR-401-IO-0016R | 6 |
| AR-727CM-IO-0804 | 3 |
| AR-321L485-5V (E series RS-485 module) | 3 (AR-321L485 parallel-type is by order.) |
Configuration:
.png)
STEP1. Set up the Node ID of AR-401-IO-0016R and controller
| A Building – 9F | B Building – 18F | C Building – 37F | ||||||||||
| Node ID of Controller | 001 | 002 | 003 | |||||||||
| Quantity of AR-401-IO-0016R | 1 | 2 | 3 | |||||||||
| Node ID of AR-401-IO-0016R | 001 | 001、002 | 002、004、005 | |||||||||
| Correspond output (701Client output setting and floor input) | 001 | 001 | 002 | 002 | 004 | 005 | ||||||
| 01 | 1F | 01 | 17 | 8F | 17 | 33 | 6F | 49 | 22F | |||
| 02 | 2F | 02 | 18 | 9F | 18 | 34 | 7F | 50 | 23F | |||
| 03 | 3F | 03 | 19 | 10F | 19 | 35 | 8F | 51 | 24F | |||
| 04 | 4F | 04 | 20 | 11F | 20 | 36 | 9F | 52 | 25F | |||
| 05 | 5F | 05 | 21 | 12F | 21 | 37 | 10F | 53 | 26F | |||
| 06 | 6F | 06 | 22 | 13F | 22 | 38 | 11F | 54 | 27F | |||
| 07 | 7F | 07 | 23 | 14F | 23 | 39 | 12F | 55 | 28F | |||
| 08 | 8F | 08 | 24 | 15F | 24 | 40 | 13F | 56 | 29F | |||
| 09 | 9F | 09 | 25 | 16F | 25 | 41 | 14F | 57 | 30F | |||
| 10 | 10 | 1F | 26 | 17F | 26 | 42 | 15F | 58 | 31F | |||
| 11 | 11 | 2F | 27 | 18F | 27 | 43 | 16F | 59 | 32F | |||
| 12 | 12 | 3F | 28 | 28 | 1F | 44 | 17F | 60 | 33F | |||
| 13 | 13 | 4F | 29 | 29 | 2F | 45 | 18F | 61 | 34F | |||
| 14 | 14 | 5F | 30 | 30 | 3F | 46 | 19F | 62 | 35F | |||
| 15 | 15 | 6F | 31 | 31 | 4F | 47 | 20F | 63 | 36F | |||
| 16 | 16 | 7F | 32 | 32 | 5F | 48 | 21F | 64 | 37F | |||
*Node ID 3 is for specific application, DIP switch setting refer to following (Table a).
*It is required to get power transmission again after modifying the Node ID of panel.

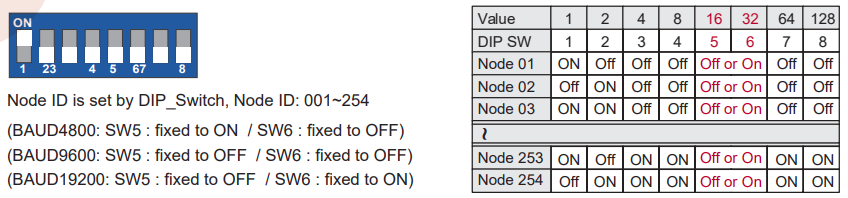 (Table a)
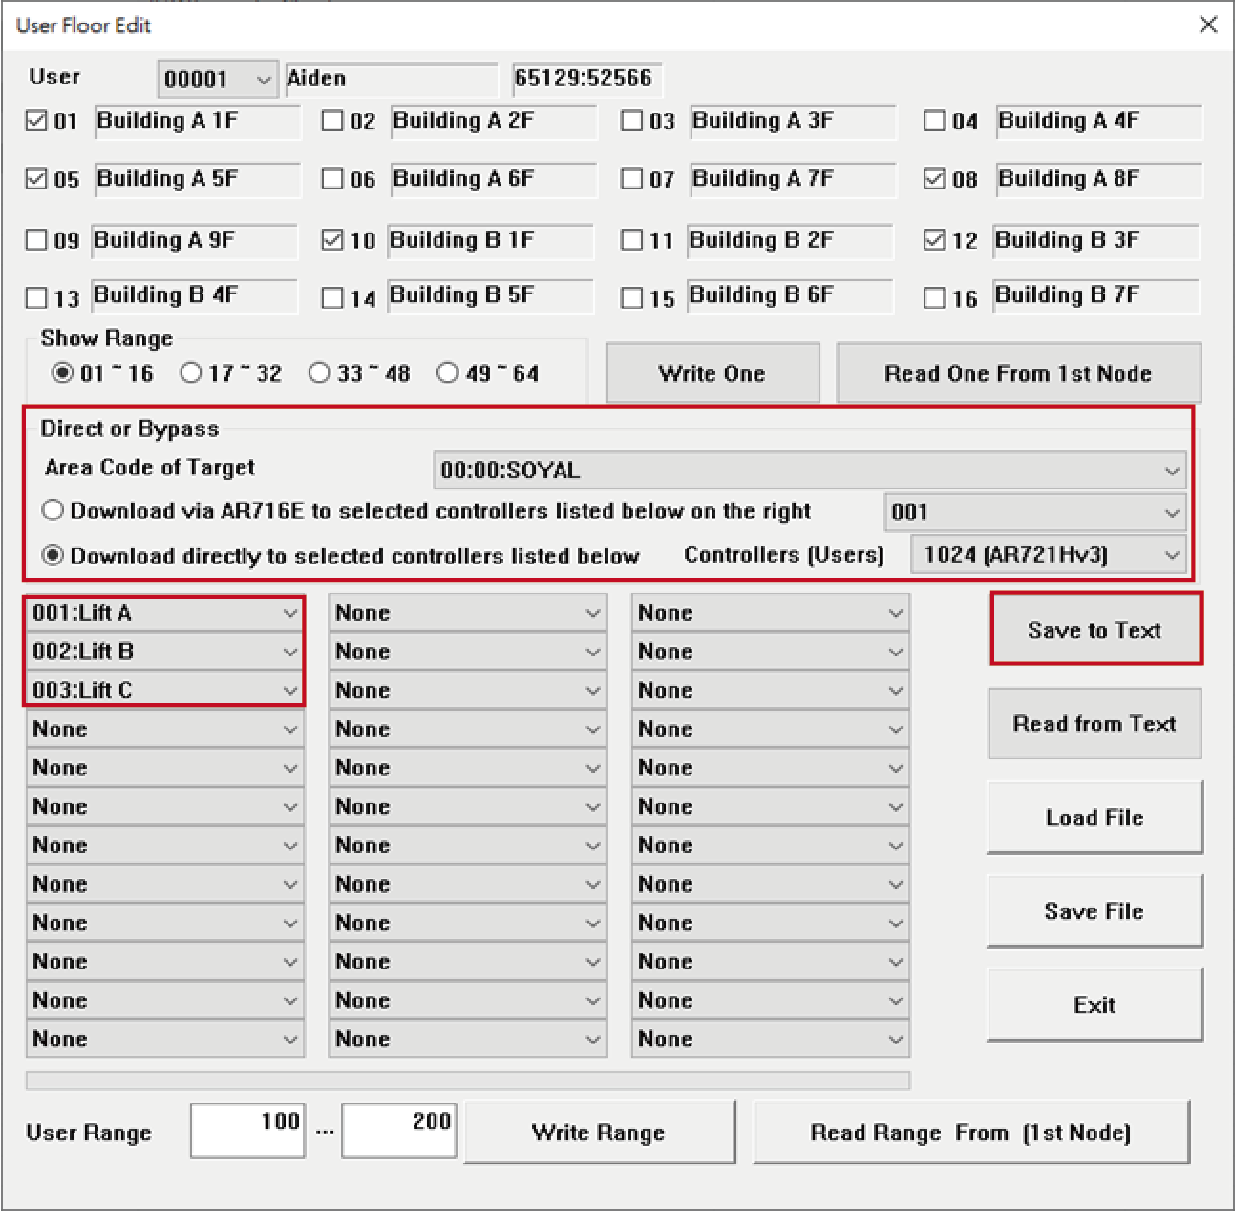
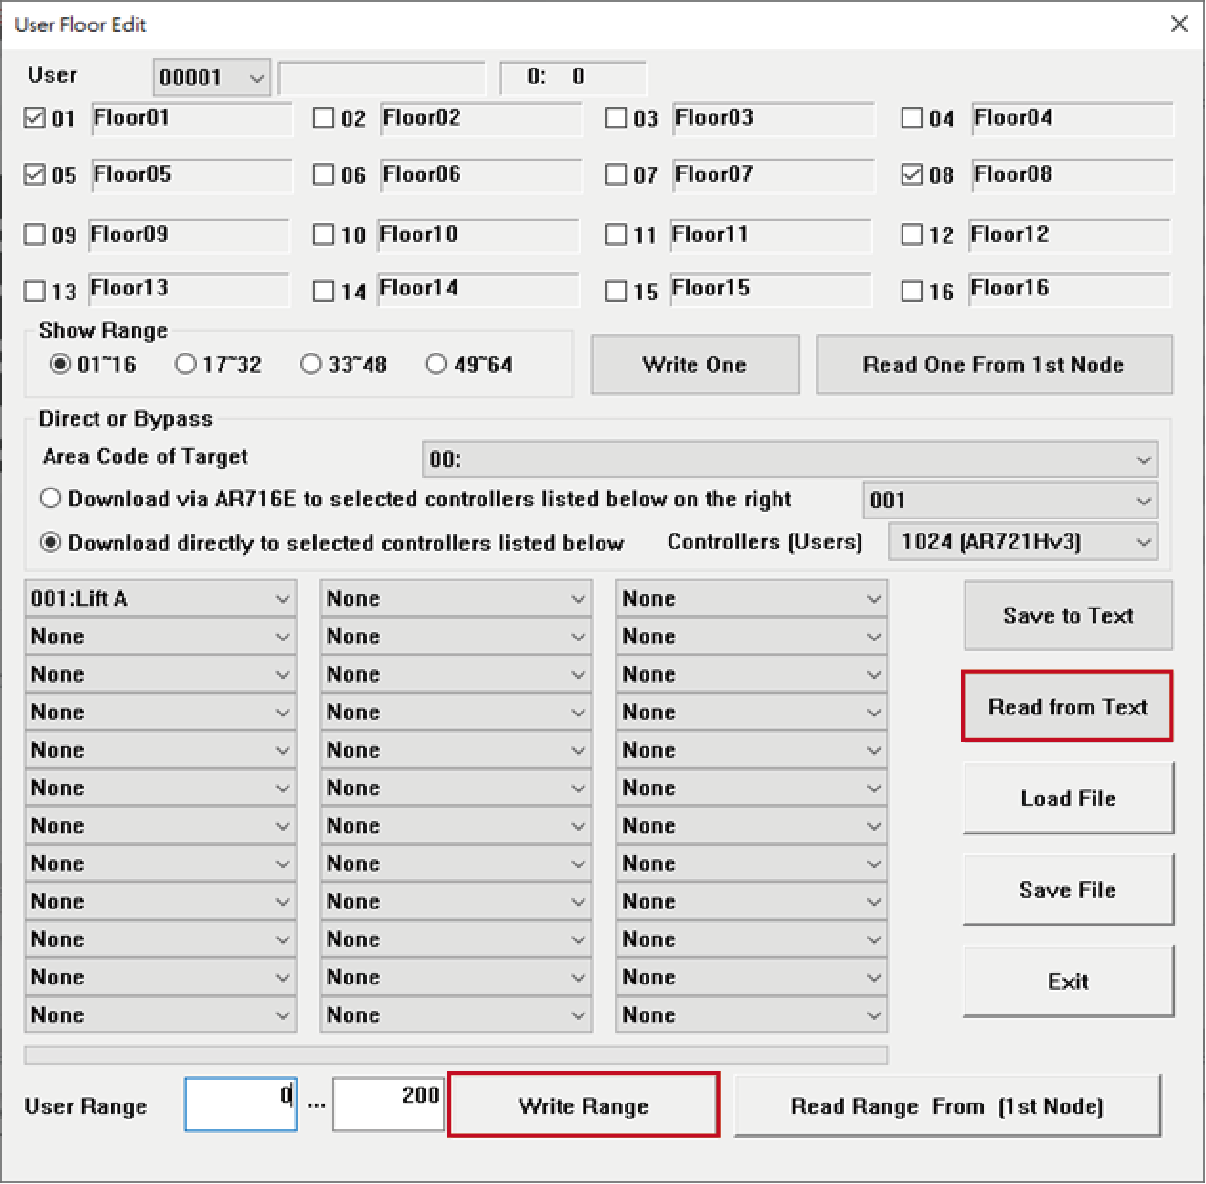
STEP2. Directly tick up the user’s access floors, or use “Save to Text” and “Read from Text” function to build plenty of access authorization of users efficiently ( refer to STEP4 )
※The name of floors are editable (FloorXX in above field).
>> How to modify the name of controller and floors in floor edit of 701ClientSQL?
※The outputs are assigned as below:
As a result, output 01~16 will be the floor 01~09 of Building A and floor 01~07 of Building B.
Output 17~32 will be the floor 08~18 of Building B and floor 01~05 of Building C.
Output 33~48 will be the floor 06~21 of Building C.
Output 49~64 will be the floor 22~37 of Building C.
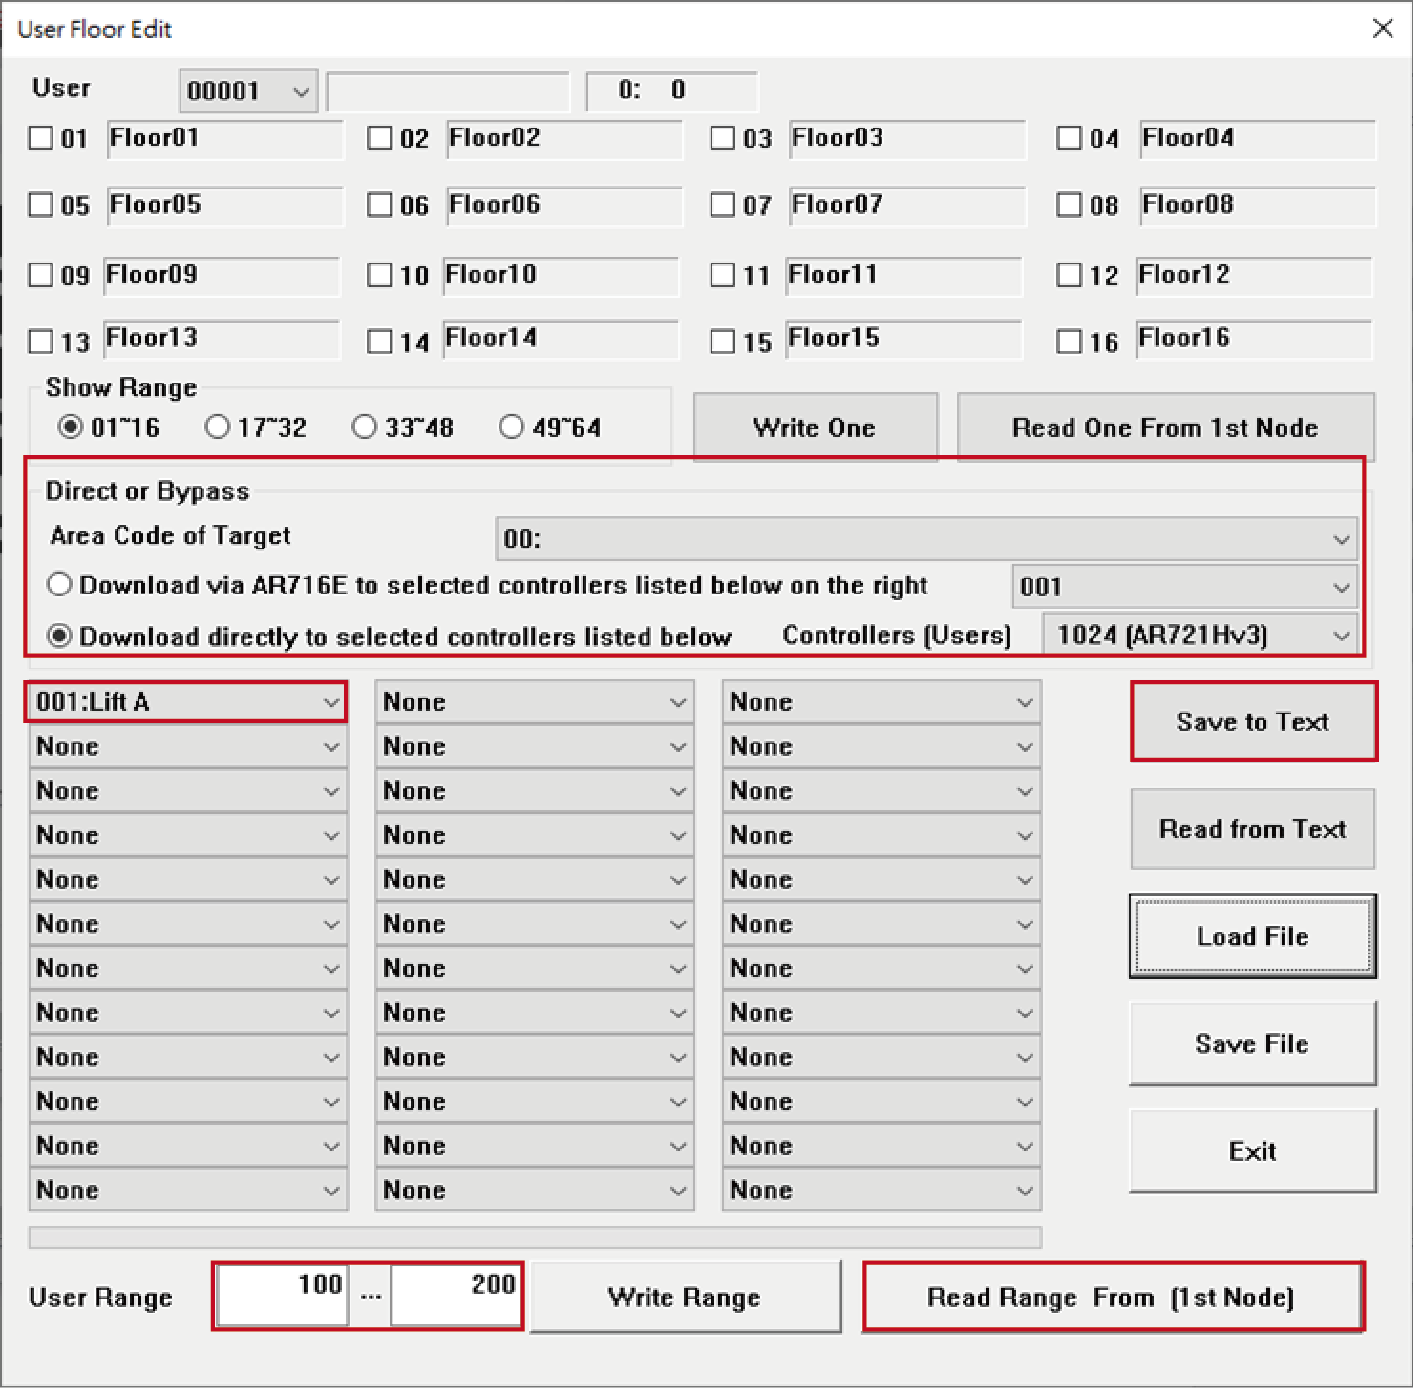
STEP3. Select the controller (it is available to select multiple controllers, hence the edit file are mutual.)
STEP4. Select “Save to Text”
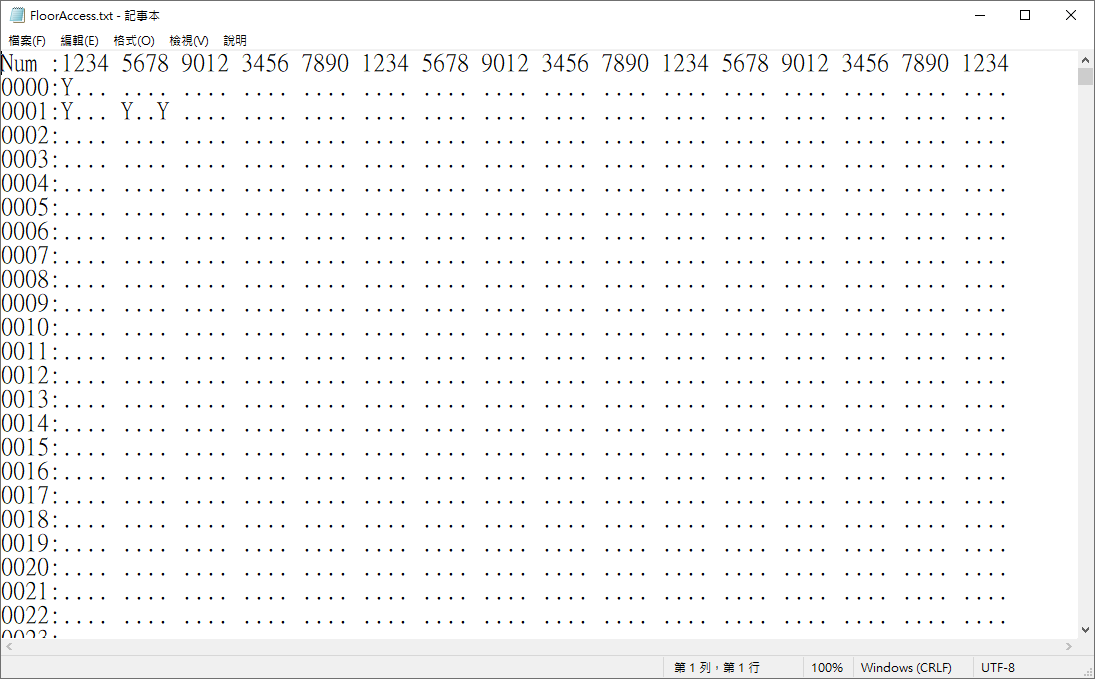
STEP4. Set the user access authorization, 1F/5F/8F of A Building, 1F/3F/10F of B Building, 1F/6F/9F of C Building.
(“Y” is available, “.” is unavailable, the number from left to right is 1F~64F)

STEP5. Select “Read from Text” and select the text file, floors will be ticked up automatically
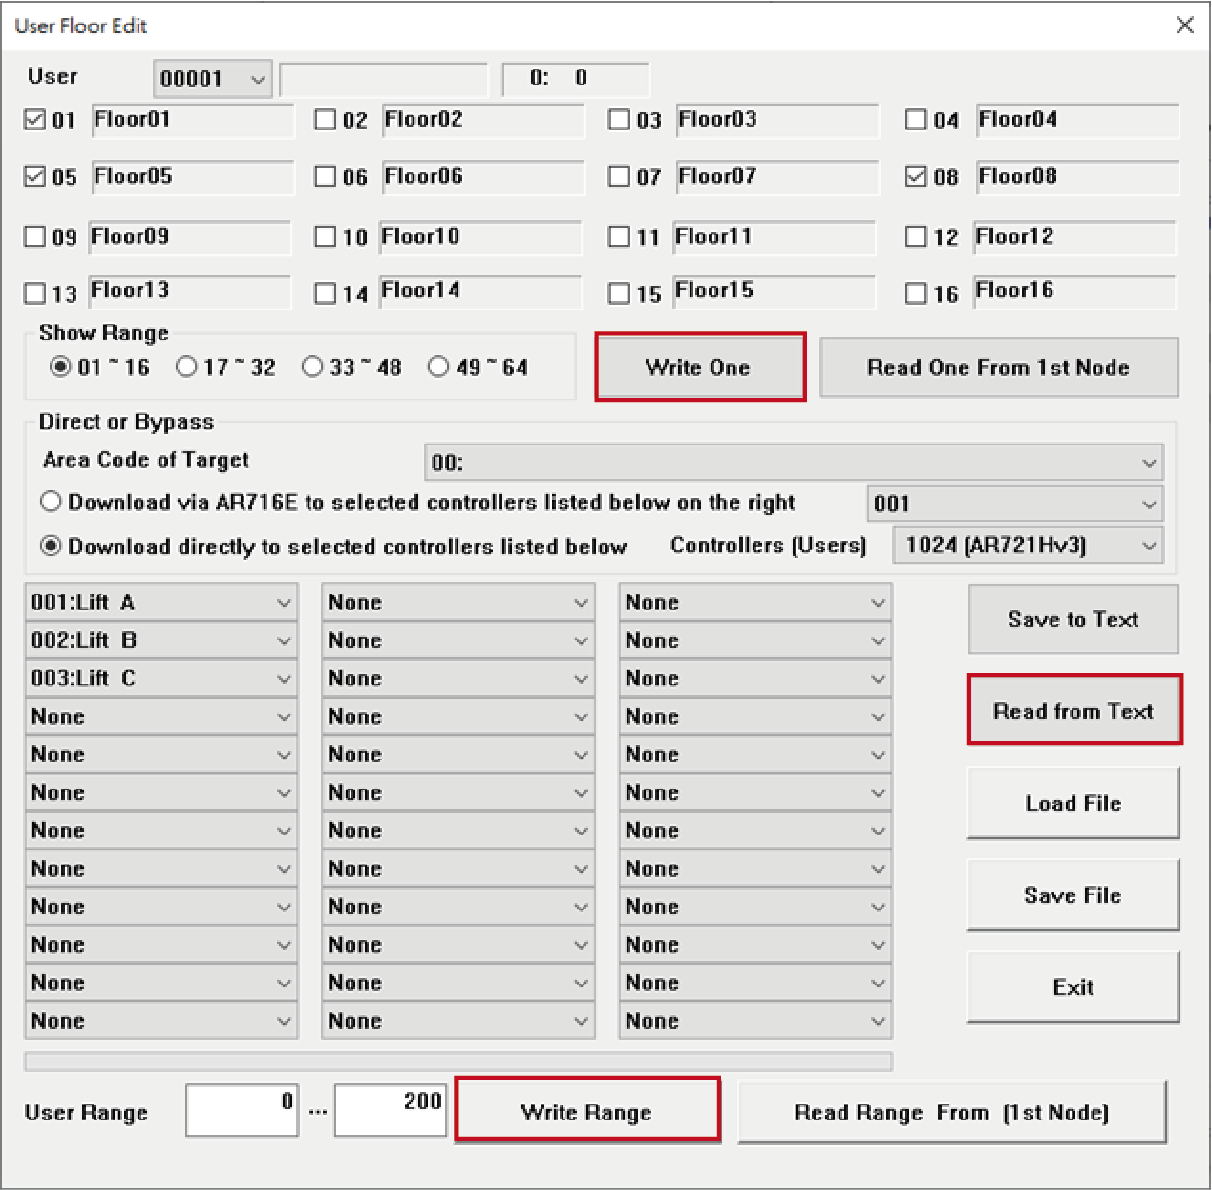
STEP6. Select “Write Range”, update all of access floor data in the range to the controllers.
*Please remind that “Write Range” function will cover all access floor data in that range, if you only modify single user’s data in User Floor Edit of 701Client, it is required to select “Write One” rather than “Write Range”, or the data is non-recoverable.
Method2. Save each floor edition document individually
Introduction:
The advantage of this solution is understandable to operator, but requiring to maintain different floor edition documents, it is more troublesome for operator to modify each user’s authorization independently before updating the modification to each controller.
STEP1. Assign the controller of Building A (Parameter setting of direct/bypass refer to manual)
STEP2. Input the user range and select “Read Range”
STEP3. Select “Save to Text”
STEP4. Set up available user access floors (e.g. 1F/5F/8F)
(“Y” is available, “.” is unavailable, the number from left to right is 1F~64F)
STEP5. Select “Read from Text” and select the text file, floors will be ticked up automatically
STEP6. Select “Write Range”, update the access floor data to controller with Node ID 001
STEP7. Do the same procedure on Lift B and C